Home
Road Map Resources
Lutherie Tools
Week Two: March 5-11
I managed to get down to the shop during the week and do one quick chore,
which was to cut and glue the heelblock to the neck blank. The rest of the
operations on this page took place on the weekend.
 The heelblock
was cut in a single block from the big log seen in last week's pictures. The
total height of the neck and heel at the juncture with the guitar body is to be
3-1/8", so there was plenty of wood in the 3x4x30 after the 3/4x3x24 was
cut out of it. Here it is being glued to the neck blank. The position is
determined by the planned position of the 14th fret - the neck-to-body juncture.
The heelblock ends 3/4" past that point to provide wood for the tenon that
will hold the neck to the headblock.
The heelblock
was cut in a single block from the big log seen in last week's pictures. The
total height of the neck and heel at the juncture with the guitar body is to be
3-1/8", so there was plenty of wood in the 3x4x30 after the 3/4x3x24 was
cut out of it. Here it is being glued to the neck blank. The position is
determined by the planned position of the 14th fret - the neck-to-body juncture.
The heelblock ends 3/4" past that point to provide wood for the tenon that
will hold the neck to the headblock.
A little terminology here. From one end to the other: The Headstock is
the piece of wood at the far end of the guitar that will be cut down to become
the peghead - this is familiar as the place the tuning machines are
mounted. Peghead veneers are laminated to the front of this piece to provide
strength and to hide the scarf joint made last week. The other side of the scarf
joint ends up where the carved curve of the neck meets the flat of the peghead,
so it's disguised by the complex geometry of the area. The next part is the neck
shaft itself. The fingerboard with the frets is glued to the front of
this, with the nut at its very end. The nut has the notches that the
strings run through, and determines the spacing of the strings at the "head
end" of the neck.
At the other end of the neck is the heel -- right now, until it's
carved, it's called the heel block. The heel is the deep part at the end
of the neck that joins to the body of the guitar. It ends in a tenon
(sometimes a dovetail tenon, but not in this guitar), which is a
projecting piece of wood that mates into a recess in another piece, which recess
is called a mortise. The piece on the guitar that contains this mortise
is called the headblock. The headblock is just inside the body of the
guitar at the "top" end.
I think that covers the terms we're going to be using for the moment. The
next job is to install the truss rod. The adjustable truss rod is now a standard
feature of steel-string guitars, both electric and acoustic. Classical
(nylon-stringed) guitars don't use them, because the string tension is so much
less that the neck is likely to stay straight without help. A little digression
here. When a guitar fretboard is absolutely straight, it won't play properly,
because the strings vibrate both side-to-side and up-and-down (and every way in
between) even though the plucking action may be side-to-side. On a straight
fretboard, the up-and-down vibrations would hit against the frets further down
the neck causing buzzing or even wrong notes. So a little relief in the
fretboard is called for. This relief is a slight curvature along the fretboard
away from the strings. So that if you were to fret the string at the first and
fourteenth frets, you would still see a little daylight between the string and
the fifth fret.
This relief is automatically provided by the tension of the strings pulling
against the neck; but it might be too much, or after some time, the neck may
tire and bend a little too far, raising the action - the height of the
strings above the frets - so high as to make the guitar unplayable. The truss
rod is able to correct this by introducing a reverse curvature inside the neck.
The simple adjustable truss rod consists of two steel rods firmly attached at
one end (or, usually, one rod bent double) and with one (upper) rod held stopped
at the other while the other (lower) rod can be shortened, by turning a nut
threaded on to it. Pulling in on the lower rod forces the upper rod into a
downward curve. When this pair of rods is embedded in the neck, its curve
forces the neck to bend back a little, restoring the relief to the proper
amount.
The truss rod is not able to adjust a bad high action on a guitar - although
the results of a truss rod adjustment can seem to do this. All the truss rod can
to is to force the neck to bend backwards, which helps only if the neck is bent
too far forwards. (Some truss rods are two-way adjustable, that is, they can add
relief as well as reduce it, but the one going into this guitar is not that
kind).
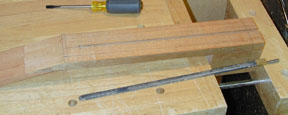 The neck shaft is
given a 1/4" groove, 9/16" deep, to accept this Luthier's Mercantile
"TRS" style truss rod. The rod itself is seen in the foreground of
this picture. It's wrapped in heat-shrink plastic to keep it from rattling in
its groove. The rod is not glued into the neck, but just laid into its groove. I
didn't take a picture of the process of making this groove, because I had both
hands on the router! Perhaps I'll go back and make a pic of the router set-up,
which involves a standard router "fence" that attaches to the bottom
of the router and slides along the side of the neck, holding the router bit at a
fixed distance from the edge of the neck. Item to remember for next time: the
router fence comes in a "U" shape with two pieces that ride the edge.
The face of each piece has a hole for mounting a continuous piece of material to
serve as a solid fence -- make that solid fence! This operation will be much
less nerve-wracking at the lower end of the neck!
The neck shaft is
given a 1/4" groove, 9/16" deep, to accept this Luthier's Mercantile
"TRS" style truss rod. The rod itself is seen in the foreground of
this picture. It's wrapped in heat-shrink plastic to keep it from rattling in
its groove. The rod is not glued into the neck, but just laid into its groove. I
didn't take a picture of the process of making this groove, because I had both
hands on the router! Perhaps I'll go back and make a pic of the router set-up,
which involves a standard router "fence" that attaches to the bottom
of the router and slides along the side of the neck, holding the router bit at a
fixed distance from the edge of the neck. Item to remember for next time: the
router fence comes in a "U" shape with two pieces that ride the edge.
The face of each piece has a hole for mounting a continuous piece of material to
serve as a solid fence -- make that solid fence! This operation will be much
less nerve-wracking at the lower end of the neck!
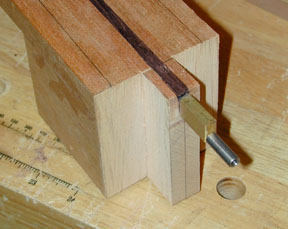
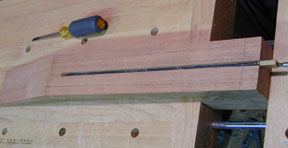 Here the rod is in
the groove, with its rectangular block hanging out the end of what will be the
neck tenon. The block has a blind hole for the upper rod and a through hole for
the lower. The lower rod is longer and it's threaded on the end, accepting a
long threaded sleeve that can be adjusted with a hex key through the soundhole
of the finished guitar.
Here the rod is in
the groove, with its rectangular block hanging out the end of what will be the
neck tenon. The block has a blind hole for the upper rod and a through hole for
the lower. The lower rod is longer and it's threaded on the end, accepting a
long threaded sleeve that can be adjusted with a hex key through the soundhole
of the finished guitar.
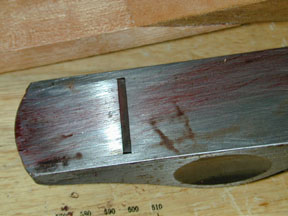
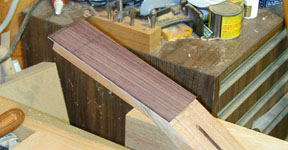
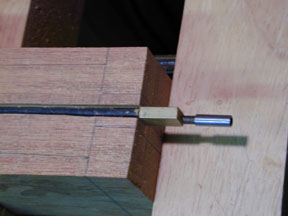 This photo shows the
end block of the truss rod as well as the markings on the neck for cutting the
tenon. The line across the neck marks the distance of the fourteenth fret from
the nut: this will be the place where the neck joins the body. The lines running
from this line to the left mark the edges of the fingerboard: the neck blank
will be carved back to these lines. The lines running from the juncture line to
the right mark the edges of the tenon. The wood outside these lines will be cut
away to leave a protrusion that will fit into the body of the guitar, into a
matching mortise in the headblock. Those paying attention will notice that the
part of the neck shaft that overhung the heelblock has been cut off.
This photo shows the
end block of the truss rod as well as the markings on the neck for cutting the
tenon. The line across the neck marks the distance of the fourteenth fret from
the nut: this will be the place where the neck joins the body. The lines running
from this line to the left mark the edges of the fingerboard: the neck blank
will be carved back to these lines. The lines running from the juncture line to
the right mark the edges of the tenon. The wood outside these lines will be cut
away to leave a protrusion that will fit into the body of the guitar, into a
matching mortise in the headblock. Those paying attention will notice that the
part of the neck shaft that overhung the heelblock has been cut off.
 The truss rod will be
covered in its groove with a spline made of rosewood. Any strong hard
wood will do for this, like maple or white oak. This spline prevents the truss
rod from bearing right against the underside of the ebony fingerboard, which it
might crack. Sealing the truss rod into the neck this way would also help, I
think, to make the action of the truss rod produce a smooth curve in the neck,
rather than a kink.
The truss rod will be
covered in its groove with a spline made of rosewood. Any strong hard
wood will do for this, like maple or white oak. This spline prevents the truss
rod from bearing right against the underside of the ebony fingerboard, which it
might crack. Sealing the truss rod into the neck this way would also help, I
think, to make the action of the truss rod produce a smooth curve in the neck,
rather than a kink.
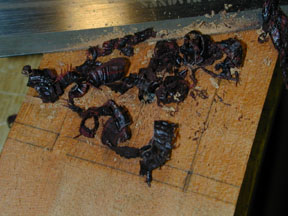
Planing the rosewood spline down to fit into the groove leaves a lot of red streaks on the
sole of the plane, and on the workbench, too. Rosewood is beautiful and strong,
but it's a problem to work with. It dulls the edges of tools that are used on
it, because of mineral inclusions in the wood, which also help to provide the
color we prize in it. This red streaking will have to be cleaned off the plane
sole before it can be used on any lighter-colored wood that's going to show on
the guitar.
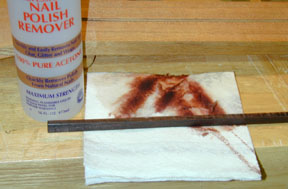 That color
comes with oils and resins that can interfere with glue doing its job. In order
to help the glue, the rosewood spline is washed with acetone. As you can see, a
lot of color comes out on the paper towel used for this, without appearing to
reduce the color in the wood piece at all. The acetone treatment seems to work
beautifully on the sole of the plane, as well, and to a lesser extent, on the
streaks on the workbench top. The acetone, as you can see, came from the
drugstore in the form of nail polish remover. Be careful not to get nail polish
removers with "proteins" or "nutrients" in them...which is
just about any ordinary nail polish remover on the market. This brand is
marketed as "professional" n. p. r. consisting of "100%
pure acetone". It's a little cheaper than the "Cutex" and
"Revlon" brands with all the additives.
That color
comes with oils and resins that can interfere with glue doing its job. In order
to help the glue, the rosewood spline is washed with acetone. As you can see, a
lot of color comes out on the paper towel used for this, without appearing to
reduce the color in the wood piece at all. The acetone treatment seems to work
beautifully on the sole of the plane, as well, and to a lesser extent, on the
streaks on the workbench top. The acetone, as you can see, came from the
drugstore in the form of nail polish remover. Be careful not to get nail polish
removers with "proteins" or "nutrients" in them...which is
just about any ordinary nail polish remover on the market. This brand is
marketed as "professional" n. p. r. consisting of "100%
pure acetone". It's a little cheaper than the "Cutex" and
"Revlon" brands with all the additives.
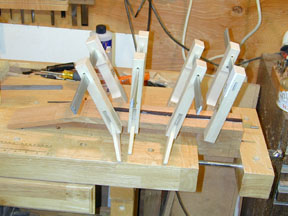 The sides of the
spline are coated lightly with yellow glue, but the bottom is avoided - we don't
want to glue the truss rod in, as it needs to be free to move within the neck.
The clamps from either side really do provide some pressure against the spline,
though it looks like they would not. But the geometry is such that it makes
sense: the neck is 3/4" thick, and the groove is 9/16" deep, leaving a
bare 3/16" underneath the truss rod - before carving! No wonder it can bend the neck back so
easily!
The sides of the
spline are coated lightly with yellow glue, but the bottom is avoided - we don't
want to glue the truss rod in, as it needs to be free to move within the neck.
The clamps from either side really do provide some pressure against the spline,
though it looks like they would not. But the geometry is such that it makes
sense: the neck is 3/4" thick, and the groove is 9/16" deep, leaving a
bare 3/16" underneath the truss rod - before carving! No wonder it can bend the neck back so
easily!
 After the clamps
come off (it's Sunday afternoon now), the spline is planed down until it's just
a small nub along its length.
After the clamps
come off (it's Sunday afternoon now), the spline is planed down until it's just
a small nub along its length.
 To finish leveling
the spline in its groove, a scraper is used, in order to have better control in
not gouging a hollow into the neck face. The scraper is simply a flat,
rectangular piece of high-quality steel. To prepare it, the edge is rubbed flat
on a whetstone on both sides, then perpendicularly to the stone. This ensures a
flat edge that's square to the sides. Then a "hook" is burnished onto
both sides of the edge by running a smooth, very hard piece of steel along the
edge with a slight angle -- either a purpose-made burnisher or the side of a
chisel. This draws out the metal on the edge of the scraper into a sharp hook
that can take very fine shavings, as you can see in the photo. You flex the
whole scraper slightly, then pull the edge along the wood, tilting it toward you
so as to make the hook "bite" into the face of the wood. It's very
easy to control just where you're scraping and leaves behind a very smooth,
shiny surface. The scraper will be used all over the guitar for finish-leveling
surfaces and very controlled, delicate cutting.
To finish leveling
the spline in its groove, a scraper is used, in order to have better control in
not gouging a hollow into the neck face. The scraper is simply a flat,
rectangular piece of high-quality steel. To prepare it, the edge is rubbed flat
on a whetstone on both sides, then perpendicularly to the stone. This ensures a
flat edge that's square to the sides. Then a "hook" is burnished onto
both sides of the edge by running a smooth, very hard piece of steel along the
edge with a slight angle -- either a purpose-made burnisher or the side of a
chisel. This draws out the metal on the edge of the scraper into a sharp hook
that can take very fine shavings, as you can see in the photo. You flex the
whole scraper slightly, then pull the edge along the wood, tilting it toward you
so as to make the hook "bite" into the face of the wood. It's very
easy to control just where you're scraping and leaves behind a very smooth,
shiny surface. The scraper will be used all over the guitar for finish-leveling
surfaces and very controlled, delicate cutting.
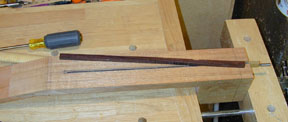
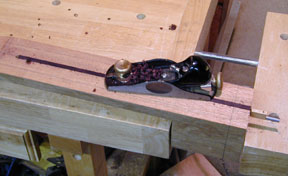
 The excess wood -- the
"cheeks" -- of the neck tenon are cut away along the lines shown in a
previous photo. This is done with a hand saw, in this case the trusty old
dozuki, or it can be done with a table saw. You might be able to see in the
photo that the faces that will meet the guitar body are angled slightly back, to
make a close fit to the body easier. The gap will be covered by the fingerboard
on top and the heel cap underneath, so nobody's the wiser. This step should be
done before the installation of the truss rod, but I got carried away and went
out of sequence. No harm, assuming I'm going to do the tenon by hand. It makes
the table saw method impossible!.
The excess wood -- the
"cheeks" -- of the neck tenon are cut away along the lines shown in a
previous photo. This is done with a hand saw, in this case the trusty old
dozuki, or it can be done with a table saw. You might be able to see in the
photo that the faces that will meet the guitar body are angled slightly back, to
make a close fit to the body easier. The gap will be covered by the fingerboard
on top and the heel cap underneath, so nobody's the wiser. This step should be
done before the installation of the truss rod, but I got carried away and went
out of sequence. No harm, assuming I'm going to do the tenon by hand. It makes
the table saw method impossible!.
 The next step
is to attach the peghead veneers. These hide the scarf joint and add strength to
the thin peghead, which is under a lot of tension from the pull of the steel
strings. Usually a steel-string will have a single dark veneer for this purpose,
and a classical may have two or three of contrasting colors. My materials came
with a thin maple and a thick rosewood veneer, and waste not, want not is my
motto, sometimes. I'm going to install them both. Cumpiano
and Natelson recommend a complicated method for installing more than one
veneer, involving registration pins and so forth to keep them from sliding
around, but recommend just clamping down a single veneer. The pins and so forth
sound like more trouble than doing the whole job twice, so I'll glue down the
maple veneer, clamp it for half an hour, then pretend it's a solid peghead and
glue and clamp the rosewood over it.
The next step
is to attach the peghead veneers. These hide the scarf joint and add strength to
the thin peghead, which is under a lot of tension from the pull of the steel
strings. Usually a steel-string will have a single dark veneer for this purpose,
and a classical may have two or three of contrasting colors. My materials came
with a thin maple and a thick rosewood veneer, and waste not, want not is my
motto, sometimes. I'm going to install them both. Cumpiano
and Natelson recommend a complicated method for installing more than one
veneer, involving registration pins and so forth to keep them from sliding
around, but recommend just clamping down a single veneer. The pins and so forth
sound like more trouble than doing the whole job twice, so I'll glue down the
maple veneer, clamp it for half an hour, then pretend it's a solid peghead and
glue and clamp the rosewood over it.
 Before doing that,
I take a well-squared block of wood and glue 100-grit sandpaper to it (I'll use
this block a bunch, I'm sure), and dress the face of the peghead, making sure
that the line of the angle comes right up to and lines up with the line marked
for the back edge of the nut. I then stand the sanding block up on edge on the
face of the neck. Holding the veneers together flat on the peghead, I rub their
ends side-to-side against the sandpaper. This gives them the proper angle to sit
up square against the nut when it's installed later.
Before doing that,
I take a well-squared block of wood and glue 100-grit sandpaper to it (I'll use
this block a bunch, I'm sure), and dress the face of the peghead, making sure
that the line of the angle comes right up to and lines up with the line marked
for the back edge of the nut. I then stand the sanding block up on edge on the
face of the neck. Holding the veneers together flat on the peghead, I rub their
ends side-to-side against the sandpaper. This gives them the proper angle to sit
up square against the nut when it's installed later.
 Being careful to
cover the peghead face entirely, I smear a thin layer of glue evenly over it and
lay the maple veneer down. With a thin caul beneath the peghead to protect it,
and a thick one on top to distribute the clamping pressure, I give it six clamps
loosely, then slowly tighten them. I have to loosen them and retighten twice to
correct slippage of the veneer; I'm trying to get it exactly up to the line that
denotes the back face of the nut. After half an hour (occupied otherwise, as you
will see) I take off the clamps and cauls and repeat with the thick rosewood
veneer. Note that the handles of the clamps are alternated up and down to keep
them from interfering with each other during tightening. Except for the big red
ones, which go wherever they want to.
Being careful to
cover the peghead face entirely, I smear a thin layer of glue evenly over it and
lay the maple veneer down. With a thin caul beneath the peghead to protect it,
and a thick one on top to distribute the clamping pressure, I give it six clamps
loosely, then slowly tighten them. I have to loosen them and retighten twice to
correct slippage of the veneer; I'm trying to get it exactly up to the line that
denotes the back face of the nut. After half an hour (occupied otherwise, as you
will see) I take off the clamps and cauls and repeat with the thick rosewood
veneer. Note that the handles of the clamps are alternated up and down to keep
them from interfering with each other during tightening. Except for the big red
ones, which go wherever they want to.
 Here's the headstock
with the veneers glued on.
Here's the headstock
with the veneers glued on.
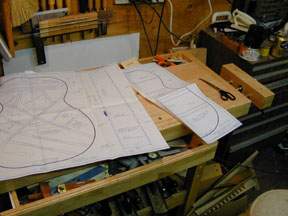 And what was I
doing while the glue was drying on the veneers? I'll digress a little. When I
was in the planning stages of this project, I sent away for several sets of
measured drawings of famous guitars. I knew I wanted something in the
finger-picking style, a smaller, crisper guitar than a dreadnaught strummer.
Among others, I located two sets of plans for an "000" - sized guitar
and ordered them from Luthier's Mercantile
and from Elderly Instruments. These turned
out to be identical sets of drawings of a Martin Grand Auditorium with fourteen
frets clear of the body. Elderly, by the way, charges $3.00 less for their plans
than LMI. I decided to build from these plans. What I did then was to designate
one set as sacrificial, to be cut up to make templates. I cut out a half-guitar
from the sacrificial set and spray-glued it to a piece of 1/8" plywood to
make a body template. I bandsawed around the paper and smoothed out the curves
with a microplane rasp.
And what was I
doing while the glue was drying on the veneers? I'll digress a little. When I
was in the planning stages of this project, I sent away for several sets of
measured drawings of famous guitars. I knew I wanted something in the
finger-picking style, a smaller, crisper guitar than a dreadnaught strummer.
Among others, I located two sets of plans for an "000" - sized guitar
and ordered them from Luthier's Mercantile
and from Elderly Instruments. These turned
out to be identical sets of drawings of a Martin Grand Auditorium with fourteen
frets clear of the body. Elderly, by the way, charges $3.00 less for their plans
than LMI. I decided to build from these plans. What I did then was to designate
one set as sacrificial, to be cut up to make templates. I cut out a half-guitar
from the sacrificial set and spray-glued it to a piece of 1/8" plywood to
make a body template. I bandsawed around the paper and smoothed out the curves
with a microplane rasp.
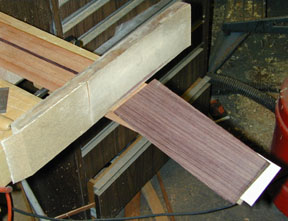
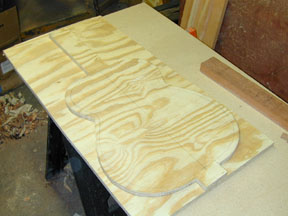 I used this
template to trace out a full-sized guitar body on two pieces of 3/4" ply to
make a workboard. The workboard is cut 1/2" larger all around than the
guitar body, and has a short neck extension for clamping it to a workbench and a
shorter tail extension for some fixtures that will come later. This kind of
looks like the back of a jumbo archtop, doesn't it?
I used this
template to trace out a full-sized guitar body on two pieces of 3/4" ply to
make a workboard. The workboard is cut 1/2" larger all around than the
guitar body, and has a short neck extension for clamping it to a workbench and a
shorter tail extension for some fixtures that will come later. This kind of
looks like the back of a jumbo archtop, doesn't it?
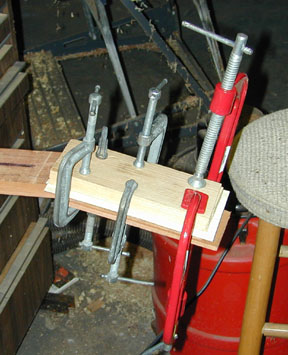
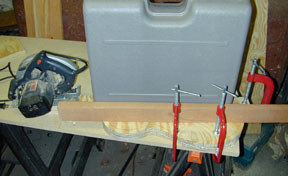 Lacking clamps
that can reach out to the middle, I weight down the two pieces for gluing with
whatever is handy.
Lacking clamps
that can reach out to the middle, I weight down the two pieces for gluing with
whatever is handy.
And so to bed for this weekend, the second of the great homemade guitar
documentary. I had hoped to get a little further this weekend, but slept in both
Saturday and Sunday. The following weekend was worse in terms of the project.
Work and social commitments prevented me from getting into the shop at all. I
picked up the following weekend, though, on the rest of the operations on the
neck.
Previous Next
Home
Road Map Resources
Lutherie Tools
Copyright © 2001 Stephen Miklos