Weekend One: The neck blank
Sunday, March 4, 2001
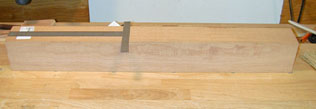 The neck material,
of Honduras mahogany, comes in a big billet 3X3X30 inches. The rulers in
the photo are 12in and 6in. It's destined to become the neck shaft, heel block,
head block, tail block and head stock. It's big enough to simply bandsaw a neck out of,
headstock, heel block and all, in one piece, with plenty left for the head and tail
blocks. That form of neck, however, has short grain in the headstock, meaning
that there are cleavage lines - the lines up the tree along which it is easy to
split the wood - passing through the headstock from front to back. The way Cumpiano
and Natelson recommend to build the neck involves a scarf joint joining a
thin headstock to a thin shaft, and attaching the heel block separately to the
shaft. This yields a stronger neck shaft headstock with the wood fibers running
straight along the lines of the neck. But it's harder to make!
The neck material,
of Honduras mahogany, comes in a big billet 3X3X30 inches. The rulers in
the photo are 12in and 6in. It's destined to become the neck shaft, heel block,
head block, tail block and head stock. It's big enough to simply bandsaw a neck out of,
headstock, heel block and all, in one piece, with plenty left for the head and tail
blocks. That form of neck, however, has short grain in the headstock, meaning
that there are cleavage lines - the lines up the tree along which it is easy to
split the wood - passing through the headstock from front to back. The way Cumpiano
and Natelson recommend to build the neck involves a scarf joint joining a
thin headstock to a thin shaft, and attaching the heel block separately to the
shaft. This yields a stronger neck shaft headstock with the wood fibers running
straight along the lines of the neck. But it's harder to make!
I started a discussion on the Musical
Instrument Makers Forum board. Opinions ranged from "hell, just bandsaw
it out, millions of guitars are made that way by the big companies" to
"I just broke a headstock the other day - along the short grain". Most
posters were irrelevantly concerned with the strength of the glue joint. I knew
that a well-made glue joint would be stronger than any piece of mahogany, so I
wasn't worried about that. What made my mind up was that I would have only one
shot at bandsawing the neck out of the billet, while I could make two or maybe
three necks from the same billet using the scarf joint. If I messed it up, I'd
have another chance. That's what I decided to do.
 The first step is to
take the neck blank out of the billet. 24 inches by 3 inches by 3/4 inch. I ran
the relevant faces of the billet over the jointer - the narrow faces were
factory-dressed, but the wide sides were rough. The end cut was made with a Japanese
Dozuki saw - one of my favorite tools - and the rip cut on the band saw
The first step is to
take the neck blank out of the billet. 24 inches by 3 inches by 3/4 inch. I ran
the relevant faces of the billet over the jointer - the narrow faces were
factory-dressed, but the wide sides were rough. The end cut was made with a Japanese
Dozuki saw - one of my favorite tools - and the rip cut on the band saw
The next step calls for cutting the neck blank along a fifteen-degree angle
to the face. The cut-off piece is then turned around and the sawn face is glued
to the underside of the main piece to make the headstock angle. This is an
extreme angle, much tighter than my miter saw can do. I looked around for a
protractor - I must have a dozen of them dating from grade school on up - and
couldn't come up with one. How to make the cut? I pondered the meaning of
fifteen degrees. I knew I could easily draft such an angle with a compass or
with a pair of drafting triangles, but I didn't want to go drafting on the side
of a piece of wood, or cutting up little pieces of paper to transfer the angle.
I started playing with my draftsman's triangles and came up with the equation 45
- 30 = 15.
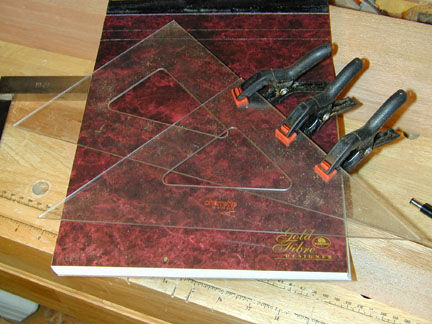
If I clamped the two triangles together with their points together and sides
aligned, the angle between the two hypotenuses would be my fifteen degrees.
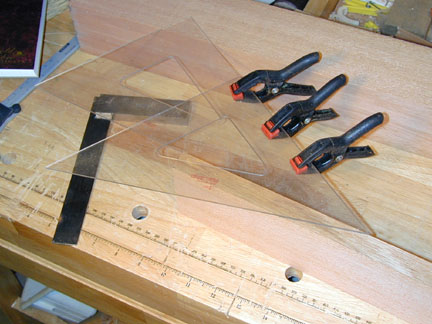
Resting the hypotenuse of the 30-60-90 triangle on the face of the board with
the 45 degree triangle resting on the edge and the points lined up with my mark
on the top gives the correct angle along the
edge of the board.
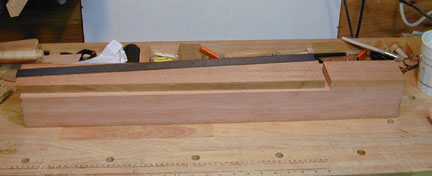
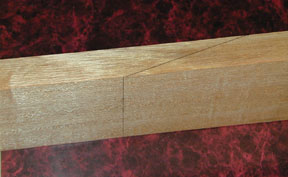 Here the board is
marked for cutting. The cut is seven inches from one end of the blank; meaning
that the furthest part of the cut is seven inches -- the short face is about
three inches. That's not totally clear in C&N, but you can figure it
out. It's a tricky cut for a handsaw, but a lot of trouble to jig
up for a table saw or bandsaw. I decide to start with the dozuki, a small
Japanese backsaw, since its tiny teeth will immediately dig in on the line, and then follow up
with something larger, since the "back" on the dozuki won't let it go
all the way through the cut. In fact, none of my backsaws will make it all the
way through, so I finish the cut with a small ryoba, seen in the background of
the next photo. These Japanese saws cut on the pull stroke, which is more
comfortable for me. The cut starts from the top in this view, and I watch the
lines down both sides as I saw.
Here the board is
marked for cutting. The cut is seven inches from one end of the blank; meaning
that the furthest part of the cut is seven inches -- the short face is about
three inches. That's not totally clear in C&N, but you can figure it
out. It's a tricky cut for a handsaw, but a lot of trouble to jig
up for a table saw or bandsaw. I decide to start with the dozuki, a small
Japanese backsaw, since its tiny teeth will immediately dig in on the line, and then follow up
with something larger, since the "back" on the dozuki won't let it go
all the way through the cut. In fact, none of my backsaws will make it all the
way through, so I finish the cut with a small ryoba, seen in the background of
the next photo. These Japanese saws cut on the pull stroke, which is more
comfortable for me. The cut starts from the top in this view, and I watch the
lines down both sides as I saw.
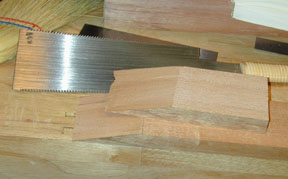 Here
is the finished cut. As you can see, the end where it feathers off is pretty
ragged, but it's very thin there and that will be taken care of with a little
planing. If you can begin to imagine how this will be put together, you're a
better visualizer than I am. I needed to turn the blocks around and line them up
before I could really see it. You'll see it in a picture later on, but imagine
the smaller block turned 180 degrees in the horizontal plane and moved
underneath the larger block and tipped so that the sawn surface meets the
underside of the larger block with the feathered end of the larger block just
meeting the line on the smaller block between the sawn surface and the original
surface. Well. You'll see.
Here
is the finished cut. As you can see, the end where it feathers off is pretty
ragged, but it's very thin there and that will be taken care of with a little
planing. If you can begin to imagine how this will be put together, you're a
better visualizer than I am. I needed to turn the blocks around and line them up
before I could really see it. You'll see it in a picture later on, but imagine
the smaller block turned 180 degrees in the horizontal plane and moved
underneath the larger block and tipped so that the sawn surface meets the
underside of the larger block with the feathered end of the larger block just
meeting the line on the smaller block between the sawn surface and the original
surface. Well. You'll see.
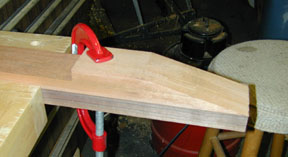 Before any of that
happens, we need to true up both sawn surfaces. Here I've clamped the small
block on top of the larger piece on a workboard that's held in my workbench
vise. The sawn faces are lined up to become one continuous plane. I'll take a
block plane and smooth out the roughness left by the saw, checking the surface
with a straightedge for flatness in all directions. This is a slow, meticulous
process, but I love working with the block plane. I use the low-angle Stanley
block plane with the adjustable mouth. I spent a good deal of time tuning it up
when I first got it, flattening the sole and knocking the corners off around the
bottom, and now it works like a charm with regular sharpening. You'll see it
frequently if you follow along.
Before any of that
happens, we need to true up both sawn surfaces. Here I've clamped the small
block on top of the larger piece on a workboard that's held in my workbench
vise. The sawn faces are lined up to become one continuous plane. I'll take a
block plane and smooth out the roughness left by the saw, checking the surface
with a straightedge for flatness in all directions. This is a slow, meticulous
process, but I love working with the block plane. I use the low-angle Stanley
block plane with the adjustable mouth. I spent a good deal of time tuning it up
when I first got it, flattening the sole and knocking the corners off around the
bottom, and now it works like a charm with regular sharpening. You'll see it
frequently if you follow along.
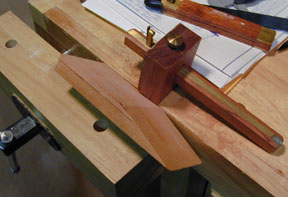 When the sawn
faces are smooth and flat, and the three lines marking the beginning of the
angle, the end of the smaller block and the end of the larger block are all
parallel, the surfaces are ready. Now the headstock piece - the smaller block -
needs to be reduced in thickness so that the tuning machines' shafts will reach
through them with enough thread showing for the nut to grab and hold. Using a
marking gauge, I mark the two long sides and the end 1/2 inch from the longer
face.
When the sawn
faces are smooth and flat, and the three lines marking the beginning of the
angle, the end of the smaller block and the end of the larger block are all
parallel, the surfaces are ready. Now the headstock piece - the smaller block -
needs to be reduced in thickness so that the tuning machines' shafts will reach
through them with enough thread showing for the nut to grab and hold. Using a
marking gauge, I mark the two long sides and the end 1/2 inch from the longer
face.
I thought about just running this piece through the bandsaw with the fence at
1/2", but it's somewhat small and I like my fingers (push stick? Moi?). I'd
have to smooth up the results with a plane anyway, and I like my plane as I've
said before. I adjust the plane for a big cut and begin hogging material off the
smaller face.
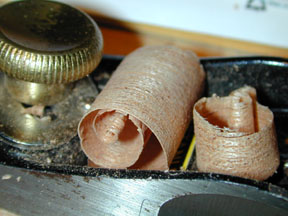 This shows what the
curl should look like when it's taking off lots of material at the start of the
process. I plane close to the edges at first, leaving a hump in the middle. The
stroke starts at the edge of the ramped part and goes toward the back square
edge. Watch the line on the back as well as the sides. When the edge comes down
to within a 16th of an inch of the line, work on the center until it's all
roughly level. Then readjust the plane for a finer shaving and bring the whole
surface down level right to the lines.
This shows what the
curl should look like when it's taking off lots of material at the start of the
process. I plane close to the edges at first, leaving a hump in the middle. The
stroke starts at the edge of the ramped part and goes toward the back square
edge. Watch the line on the back as well as the sides. When the edge comes down
to within a 16th of an inch of the line, work on the center until it's all
roughly level. Then readjust the plane for a finer shaving and bring the whole
surface down level right to the lines.
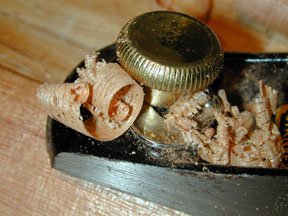 Here's what the plane
does when it's set for a thin shaving. With this type of plane you can set the
mouth closer as well as pulling back on the blade. This helps to eliminate
tear-out where the grain is contrary. On bigger planes you'd have to take the
plane apart and move the frog forward to accomplish the same thing.
Here's what the plane
does when it's set for a thin shaving. With this type of plane you can set the
mouth closer as well as pulling back on the blade. This helps to eliminate
tear-out where the grain is contrary. On bigger planes you'd have to take the
plane apart and move the frog forward to accomplish the same thing.
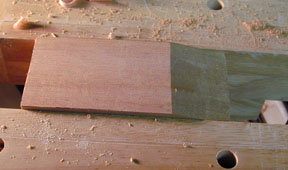 When the line
demarcating the beginning of the ramped section is straight, you've flattened
the top surface. At this point it needs to come down just a hair in the center
(it looks tilted because of the camera angle). I said it was a lot more work
making a scarf joint than just bandsawing it out. But don't fear, we're nearly
ready to glue up.
When the line
demarcating the beginning of the ramped section is straight, you've flattened
the top surface. At this point it needs to come down just a hair in the center
(it looks tilted because of the camera angle). I said it was a lot more work
making a scarf joint than just bandsawing it out. But don't fear, we're nearly
ready to glue up.
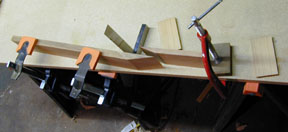 Here's the setup
for gluing recommended in Cumpiano
and Natelson, with a small difference. Instead of using a narrow board, I'm
at the edge of a table. It doesn't make a lot of difference, just a little
harder to fit all the clamps. Two clamps hold down the main shaft while an
engineer's square checks to see that it's perpendicular to the tabletop. A clamp
on the right holds down a stop block that will keep the headstock from slipping
along the slippery glue plane. Two cauls a little narrower than the joint are
ready.
Here's the setup
for gluing recommended in Cumpiano
and Natelson, with a small difference. Instead of using a narrow board, I'm
at the edge of a table. It doesn't make a lot of difference, just a little
harder to fit all the clamps. Two clamps hold down the main shaft while an
engineer's square checks to see that it's perpendicular to the tabletop. A clamp
on the right holds down a stop block that will keep the headstock from slipping
along the slippery glue plane. Two cauls a little narrower than the joint are
ready.
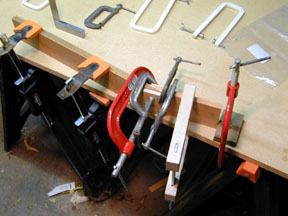 Glue is applied to
the sawn face of the headstock, and it is swung into place to meet the shaft.
The cam clamp (second clamp from the right) holds it down, while the cauls
protect both surfaces from the four C clamps pulling it all together.
Glue is applied to
the sawn face of the headstock, and it is swung into place to meet the shaft.
The cam clamp (second clamp from the right) holds it down, while the cauls
protect both surfaces from the four C clamps pulling it all together.
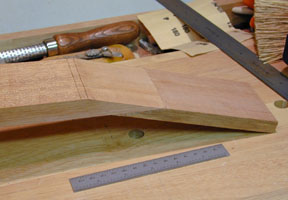 And here's the
glued-on headstock. A lot of work, but it came out well. That's a six-inch scale
for reference.
And here's the
glued-on headstock. A lot of work, but it came out well. That's a six-inch scale
for reference.
This operation -- everything up to this point -- took one Sunday afternoon
from about 2:00 to 6:00, including an hour in the clamps. Including a 4:00 run
out to Home Depot when I realized I had no fresh glue. Including searching
around for the protractor and coming up with a trick substitute. Including a lot
of head-scratching and pondering over what do do next and exactly how. The next
time I do this operation, it's probably 40 minutes excluding the glue-drying
time.
Next: Truss rod, heel block, headstock veneers, who knows what else?
Carving the heel, cutting out the peghead, drilling? Find out next week,
same web-time same web-channel.
Back to Prologue
Continue
Home
Road Map Resources
Lutherie Tools
Copyright © 2001, 2002 Stephen Miklos