Notes on Tools
(under construction - expect to see more photos and material on use and other
ruminations)
I purchased a few specialist tools for this project, probably more than I
should have. Perhaps the most dubious purchase was a set of nut-slot files,
which come in a wide variety of precise widths to match the sizes of guitar
strings. They were not objectively expensive, though taken together it came to a
piece of change. Imagine my consternation when I read how you can use a cast-off
piece of guitar string to saw the nut slot to an exact fit for a string of the
same size.
Most of the tools used, however, are ordinary woodworking tools. I like
Japanese handsaws because I can't clumsy up and kink them while pushing through
the cutting stroke too energetically -- they cut on the pull stroke. A good
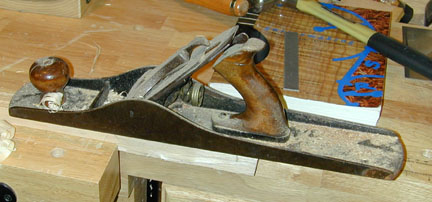
block plane is essential, at least if you're me. I like the Stanley low-angle
model with the adjustable mouth, which you see in a good number of pictures in
the journal. Chisels good and bad -- the bad one is for chipping dried glue
squeeze-out. Rasps and files, along with an aggressively-cutting
Microplane or Surform tool. And, much as I prefer to use hand tools, I resort to
the router, bandsaw, and drill press when specific operations match their
strengths. Yes, and a jointer. I know I could use a jointer plane; I'll get one
someday and wean myself away from this beast.
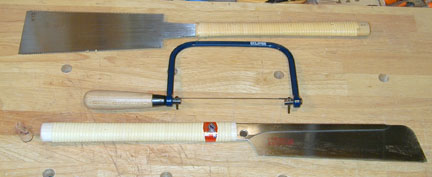
These are the handsaws I'm using. At the top is a small ryoba saw. It has
crosscut teeth on one side and rip teeth on the other. At the bottom is a
Dozuki. Its tiny teeth leave a clean kerf of no more than 1/32". The dozuki
is new today (Mar 24), bought to replace one that has hit the concrete floor in
my basement shop too many times. In using it on the mahogany neck of the
steel-string guitar project, I find it cuts 1/4" deep on a single stroke
with no downward pressure other than the negligible weight of the saw. And
straight and smooth -- it is a pure joy to use. The Japanese saws' teeth are
sharpened to cut on the pull stroke, which I find much more comfortable than the
western saw's forward-cutting teeth. So the coping saw in the middle is set up
with the blade "backward", too.
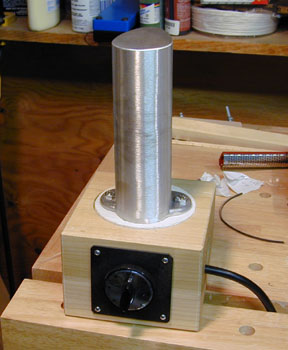 Early
luthiers used a metal pipe that sat atop a box of hot coals. Some moderns use a
pipe into which the flame from a blowtorch is directed. Having had a house fire
once, I preferred an electrical marvel with a thermostat to keep it from
overheating. And what does it do? It provides heat and a curved surface against
which the luthier can bend the wood for the curved sides of an instrument. The
wood for the sides is soaked briefly (fifteen to thirty minutes) in water, then
worked against the hot bending iron. The iron is hot enough to force steam into
the wood from the water soaked into the surface, and the heat and moisture
plasticize the fibers of the wood, allowing it to bend. When the wood cools, it
retains the shape it was bent into.
Early
luthiers used a metal pipe that sat atop a box of hot coals. Some moderns use a
pipe into which the flame from a blowtorch is directed. Having had a house fire
once, I preferred an electrical marvel with a thermostat to keep it from
overheating. And what does it do? It provides heat and a curved surface against
which the luthier can bend the wood for the curved sides of an instrument. The
wood for the sides is soaked briefly (fifteen to thirty minutes) in water, then
worked against the hot bending iron. The iron is hot enough to force steam into
the wood from the water soaked into the surface, and the heat and moisture
plasticize the fibers of the wood, allowing it to bend. When the wood cools, it
retains the shape it was bent into.
Some luthiers, and pretty much all factories, use bending machines that form
the wood around heated molds. If I want to make a differently-shaped guitar each
time I build (and I probably will), I can dispense with the expense and effort
of mold-building by shaping my sides free-form using a bending iron.
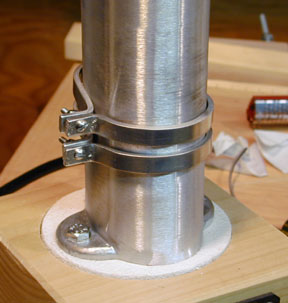 These are aluminum
bands that are fitted to the bending iron for bending thin material, like
purfling, that is thicker than side material. The bands are set apart a distance
equal to the width of the material, and can transfer heat to the full thickness,
allowing it to bend. They also mechanically keep the bending material from
twisting, as it might if it is thicker (in the bending plane) than it is wide
(in the surface against the iron).
These are aluminum
bands that are fitted to the bending iron for bending thin material, like
purfling, that is thicker than side material. The bands are set apart a distance
equal to the width of the material, and can transfer heat to the full thickness,
allowing it to bend. They also mechanically keep the bending material from
twisting, as it might if it is thicker (in the bending plane) than it is wide
(in the surface against the iron).
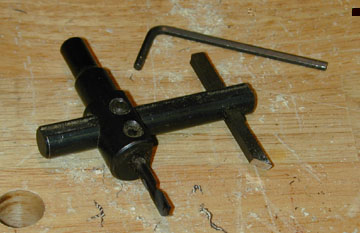 This
ordinary fly cutter is used to cut the soundhole out of the top. Note the cutter
is angled to a point with the flat surface out; this gives a soundhole with a
straight wall. I didn't use this to rout the channels for the rosette, but with
a squared-off cutter, it could be used for that. The cutter in that case acts as
a scraper, scraping down the width of the channel. This cutter, however, has a
maximum radius of two inches, which is too small for such a use.
This
ordinary fly cutter is used to cut the soundhole out of the top. Note the cutter
is angled to a point with the flat surface out; this gives a soundhole with a
straight wall. I didn't use this to rout the channels for the rosette, but with
a squared-off cutter, it could be used for that. The cutter in that case acts as
a scraper, scraping down the width of the channel. This cutter, however, has a
maximum radius of two inches, which is too small for such a use.
 This
is a fore plane, a somewhat obscure member of the family of bench planes that
includes the block, smoothing, jack, and jointer planes. The fore plane is
longer than a jack, but not as long as a jointer. The somewhat unhelpfully
placed ruler on top of the book is six inches. Because of its long sole, it
lifts the cutter over small dips in the surface, allowing it only to cut away
the higher points, so it can accurately level a board all along its length. This
is also the function of the jointer plane, so many folks skip this one. I don't
happen to have a jointer plane, so I use this for that purpose. It works well on
pieces the length of an x-brace, which is what I used it for on the guitar. It
has a corrugated sole to reduce drag, which isn't much of a factor on things as
narrow as braces, but can be a big help when using this fairly heavy plane on
wider surfaces. I picked this up at a junk shop for $25.00; it was in almost
perfect tune, the sole nice and flat and the cap iron ground well. The blade
just needed normal sharpening. I got quite a bargain!
This
is a fore plane, a somewhat obscure member of the family of bench planes that
includes the block, smoothing, jack, and jointer planes. The fore plane is
longer than a jack, but not as long as a jointer. The somewhat unhelpfully
placed ruler on top of the book is six inches. Because of its long sole, it
lifts the cutter over small dips in the surface, allowing it only to cut away
the higher points, so it can accurately level a board all along its length. This
is also the function of the jointer plane, so many folks skip this one. I don't
happen to have a jointer plane, so I use this for that purpose. It works well on
pieces the length of an x-brace, which is what I used it for on the guitar. It
has a corrugated sole to reduce drag, which isn't much of a factor on things as
narrow as braces, but can be a big help when using this fairly heavy plane on
wider surfaces. I picked this up at a junk shop for $25.00; it was in almost
perfect tune, the sole nice and flat and the cap iron ground well. The blade
just needed normal sharpening. I got quite a bargain!
 A
spoke shave is like a plane with a very short sole, which may be curved or
straight in both directions, i.e., it may be curved along the sole perpendicular
to the cutting edge, and the cutting edge may be curved as well. As its name
implies, it was originally conceived to shape the spokes of wagon wheels, which
are not round, but rather a flattened oval shape. In guitar building, it is used
to shape the flattened oval of the neck. This spoke shave belonged to my
grandfather and still hums along, as you can see by the long curls of mahogany
coming out of it here.
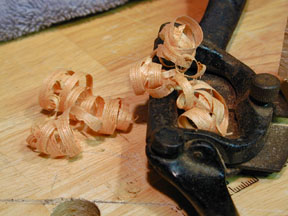
A
spoke shave is like a plane with a very short sole, which may be curved or
straight in both directions, i.e., it may be curved along the sole perpendicular
to the cutting edge, and the cutting edge may be curved as well. As its name
implies, it was originally conceived to shape the spokes of wagon wheels, which
are not round, but rather a flattened oval shape. In guitar building, it is used
to shape the flattened oval of the neck. This spoke shave belonged to my
grandfather and still hums along, as you can see by the long curls of mahogany
coming out of it here.
Copyright © 2001 Stephen Miklos