Home
Road Map Resources
Lutherie Tools
Week 12 June 4 - 13
The process of carving the neck was one of my favorite parts of this project
so far. That may go some way to explain why I didn't stop and take pictures
between the beginning and end of the process -- it was too relaxing and too much
fun. C&N have a very good pictorial
series on this process, words for once having failed them to explain the carvin'
o' the neck. I'll have to wimp out and refer you to them for the pictorial steps. If
you've been following along, you'll probably be relieved that I haven't snapped in excruciating detail!
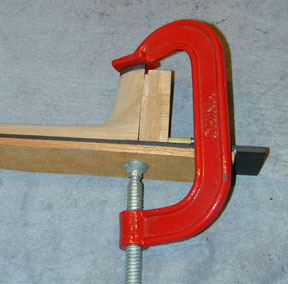
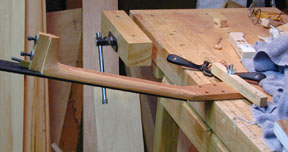 Well,
this is rather clever, isn't it? I got the soundboard clamp and put the bolt
through one of the bench-dog holes in my bench and through one of the
tuning-machine holes in the peghead. This holds the neck steady so I can use two
hands to operate the spoke shave
seen in the background and in the next picture.
Well,
this is rather clever, isn't it? I got the soundboard clamp and put the bolt
through one of the bench-dog holes in my bench and through one of the
tuning-machine holes in the peghead. This holds the neck steady so I can use two
hands to operate the spoke shave
seen in the background and in the next picture.
 I
set about carving without attaching the heel cap. So here it is being glued on
ex post facto.
I
set about carving without attaching the heel cap. So here it is being glued on
ex post facto.
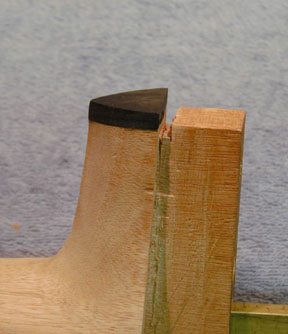 This
shows the heel cap glued on and partly carved to match the heel profile, and
also a notch I've cut into the heel tenon to accommodate the binding running
along the back underneath the heel. Here you can also see one of my many klutz
marks, a chip out of the edge of the heel that's going to show when the guitar
is assembled.
This
shows the heel cap glued on and partly carved to match the heel profile, and
also a notch I've cut into the heel tenon to accommodate the binding running
along the back underneath the heel. Here you can also see one of my many klutz
marks, a chip out of the edge of the heel that's going to show when the guitar
is assembled.
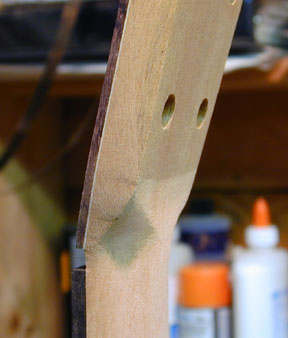
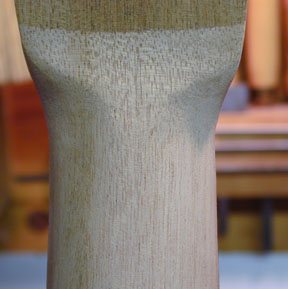 I
told you I didn't stop to take pictures during the carving process. The
peghead-to-neck transition needs a little more work here, but not much. You can
see the edge of the scarf joint running across the peghead here.
I
told you I didn't stop to take pictures during the carving process. The
peghead-to-neck transition needs a little more work here, but not much. You can
see the edge of the scarf joint running across the peghead here.
 This
came out rather well, and I'm pleased with the shape. I had a bit of trouble
visualizing it in a vacuum, and I didn't like the style of transition pictured in
C&N, so I referred to other guitars I had around the house to get a feel for
how to shape this. It just needs a little touching up here.
This
came out rather well, and I'm pleased with the shape. I had a bit of trouble
visualizing it in a vacuum, and I didn't like the style of transition pictured in
C&N, so I referred to other guitars I had around the house to get a feel for
how to shape this. It just needs a little touching up here.
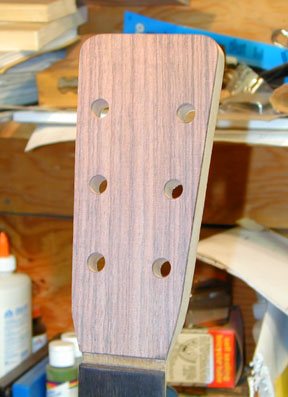 I
rounded over the corners of the peghead. It still seems to want an inlay, but I
think I'll pass up on that for a while. I may do it as a retrofit, if I think of
something to put on it!
I
rounded over the corners of the peghead. It still seems to want an inlay, but I
think I'll pass up on that for a while. I may do it as a retrofit, if I think of
something to put on it!
I agonized over what to use to finish the guitar.
Everything seemed either extremely difficult or toxic or expensive to equip for.
I read dozens of articles about guitar finishes. Shellac was attractive because
it is non-toxic and requires more skill and patience than costly equipment. I've
always been shy of finishes in my woodworking, tending toward oil and wax rather
than anything sprayed or brushed. I also have had problems with dust in my
basement shops over the years, so something that basically dries as you put it
on is a plus. I settled on padded shellac as my finish.
Shellac applied with a pad is a very old, traditional finish for musical
instruments. It makes a very thin and flexible finish that will not scratch
white and which can take a high gloss. Shellac is either an excretion of insects
that attach certain South Asian trees or an excretion of the trees attacked by
the bugs or a combination of the two -- there is some controversy. The stuff is
non-toxic; in fact shellac is approved by the U.S. Food and Drug administration
as a coating for pills and candy.
 The process of finishing with padded shellac is often called French Polishing,
and the shellac dissolved in alcohol is often referred to as French Polish. The
LMI handbook/catalog has two articles on French Polishing giving two quite
different techniques, and Fine Woodworking On Finishing has two articles giving
two more different approaches. American Lutherie has some more different advice
in The Big Book Of American Lutherie (Volume 2). I read them all and picked the
easiest one!
The process of finishing with padded shellac is often called French Polishing,
and the shellac dissolved in alcohol is often referred to as French Polish. The
LMI handbook/catalog has two articles on French Polishing giving two quite
different techniques, and Fine Woodworking On Finishing has two articles giving
two more different approaches. American Lutherie has some more different advice
in The Big Book Of American Lutherie (Volume 2). I read them all and picked the
easiest one!
The pad in the picture is made of an old sweat sock rolled up and wrapped in
a piece of a cotton tee shirt. The pad is called a fad or a pad or a muñeca or a
tampon or a sock wadded up in a piece of tee shirt. The shellac comes in solid
flakes that must be dissolved in pure grain alcohol (you can use denatured
alcohol, but I really don't believe in using denatured alcohol -- all it is is
alcohol with poison added to it to make you throw up if you drink it. I know I'm
not going to drink it (and what if I did?), and I have no children in the house, so why bother?). I
got a glass jar and filled it about an inch deep in shellac flakes (I got 'em
from Woodworker's Club/Woodcraft) and put in alcohol up to an inch and a half. I
shook it and put it away for a few days, shaking it whenever I thought of it.
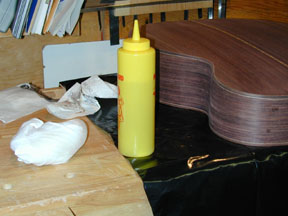
When I went to use it, I put it in a (brand new) mustard dispenser so I could
easily charge the pad with controlled amounts.
 The
first step is to give the whole guitar a wash coat of the shellac. This will
serve as a base for the filler on the rosewood parts. I squirt a little polish
onto the pad and rub it in small circles on the surface of the guitar body.
According to the things I've read, I never let the pad stop on the surface, but
"glide" it onto and off of the surface. I rub until the pad is
somewhat dry and is just beginning to stick on the surface, and then shoot a
little more polish into it and go on. The resulting layer is so thin that it
lacks any tack to pick up dust, and is practically dry to the touch.
The
first step is to give the whole guitar a wash coat of the shellac. This will
serve as a base for the filler on the rosewood parts. I squirt a little polish
onto the pad and rub it in small circles on the surface of the guitar body.
According to the things I've read, I never let the pad stop on the surface, but
"glide" it onto and off of the surface. I rub until the pad is
somewhat dry and is just beginning to stick on the surface, and then shoot a
little more polish into it and go on. The resulting layer is so thin that it
lacks any tack to pick up dust, and is practically dry to the touch.
 This
is going to take a lot of short sessions, so I seal the pad in a jar with a
little alcohol. I try a little drop of white glue on the tip of the mustard
dispenser to see if it will keep the shellac fresh. Update: the drop of glue
disappeared, either it shrank back away from the hole or it fell in (I hope not,
and I don't think so) but the shellac shows no sign of drying out over the
course of three days (so far).
This
is going to take a lot of short sessions, so I seal the pad in a jar with a
little alcohol. I try a little drop of white glue on the tip of the mustard
dispenser to see if it will keep the shellac fresh. Update: the drop of glue
disappeared, either it shrank back away from the hole or it fell in (I hope not,
and I don't think so) but the shellac shows no sign of drying out over the
course of three days (so far).
Previous Next
Home
Road Map Resources
Lutherie Tools
Copyright © 2001 Stephen Miklos