Home
Road Map Resources
Lutherie Tools
Week 11: May 29 - June 3
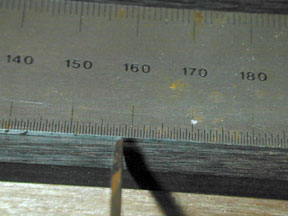
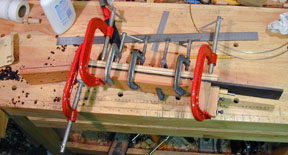
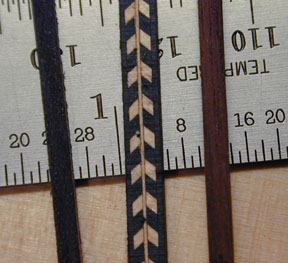 These
are the three elements of the binding/purfling that I'm using. The two photos
show the top view and side view of the same three strips. The strip on the left
is the same black-white-black wooden strip that was used as part of the rosette.
It's the narrow purfling used on the back of the guitar. The center is the
herringbone strip that's used as purfling on the soundboard and the strip on the
right is rosewood with a thin line of maple or holly or some other white wood.
This last is used as binding on both the soundboard and back. The scale is
marked in 1/32" increments
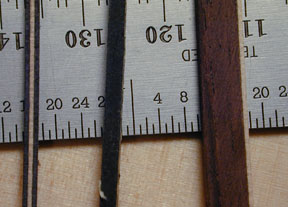
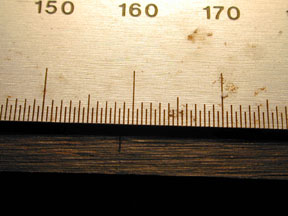
These
are the three elements of the binding/purfling that I'm using. The two photos
show the top view and side view of the same three strips. The strip on the left
is the same black-white-black wooden strip that was used as part of the rosette.
It's the narrow purfling used on the back of the guitar. The center is the
herringbone strip that's used as purfling on the soundboard and the strip on the
right is rosewood with a thin line of maple or holly or some other white wood.
This last is used as binding on both the soundboard and back. The scale is
marked in 1/32" increments
 LMI
recommends bending the herringbone dry, and it bends quite readily, possibly
because the heat makes the glue let go a little and allows all the components to
slide around against each other slightly. The b-w-b also bends without a
problem, but the binding strip was a real pain. I bent the strips for the back
dry, and had some cracks where there was short grain in the strip; I was quite
surprised to find that is wasn't straight-grained like everything else supplied
in the box, but took it as a lesson and went on more carefully, soaking the
binding strips before bending them for the face. Though I was able to push the
binding flush everywhere in a dry run, I got gaps in several places on the back
between the binding and purfling. I could not see these gaps while taping the
glued binding down, but there they were when I lifted the tape. This was the
most unsatisfactory part of the process so far. As I mentioned on an
earlier page, I hope to be able to fill these gaps with burn-in lacquer
stick.
LMI
recommends bending the herringbone dry, and it bends quite readily, possibly
because the heat makes the glue let go a little and allows all the components to
slide around against each other slightly. The b-w-b also bends without a
problem, but the binding strip was a real pain. I bent the strips for the back
dry, and had some cracks where there was short grain in the strip; I was quite
surprised to find that is wasn't straight-grained like everything else supplied
in the box, but took it as a lesson and went on more carefully, soaking the
binding strips before bending them for the face. Though I was able to push the
binding flush everywhere in a dry run, I got gaps in several places on the back
between the binding and purfling. I could not see these gaps while taping the
glued binding down, but there they were when I lifted the tape. This was the
most unsatisfactory part of the process so far. As I mentioned on an
earlier page, I hope to be able to fill these gaps with burn-in lacquer
stick.
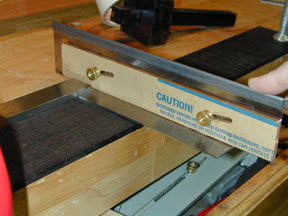
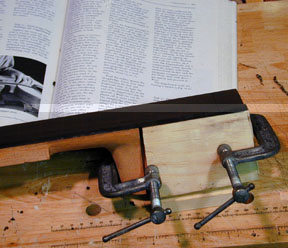
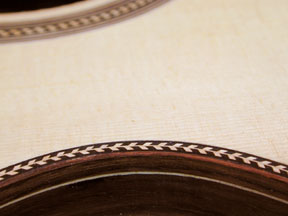 There
is a slight variation in the depth of the rout, due at least in part to the
slight arching of the soundboard. In addition, the depth of the purfling ledge
is deliberately limited to keep at least 1/32" of the soundboard under it
in contact with the linings inside the box. Together these factors mean that the
purfling and binding will stand a bit proud of the side and top and will need to
be scraped down. As attentive readers will have noticed, I don't mind using a
scraper; in fact I get a kick out of it. I spent a happy hour or so scraping the
bindings down to what you see in this photo.
There
is a slight variation in the depth of the rout, due at least in part to the
slight arching of the soundboard. In addition, the depth of the purfling ledge
is deliberately limited to keep at least 1/32" of the soundboard under it
in contact with the linings inside the box. Together these factors mean that the
purfling and binding will stand a bit proud of the side and top and will need to
be scraped down. As attentive readers will have noticed, I don't mind using a
scraper; in fact I get a kick out of it. I spent a happy hour or so scraping the
bindings down to what you see in this photo.
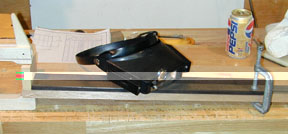 I
have been eager to get to this next step, making the fingerboard. It's a real
milestone. Once this is done, only the bridge remains as a major part that's not
at least shaped and recognizable. Here's the setup for marking the fret
locations. Readers over forty will appreciate the headband magnifier, for
reading the half-millimeter scale. The
ebony blank is flattened and thinned to 7/32" and the nut end is flat and
square to the edges. A block of wood is clamped to a plank to act as an end
stop, and the fingerboard blank is butted up against it. A ruler marked in
half-millimeters is also butted up to the stop and clamped down on the
fingerboard blank. The plans with the list of fret distances is handy, and so is
a can of caffeine-free diet Pepsi (you don't want shaky hands or a sugar high).
I
have been eager to get to this next step, making the fingerboard. It's a real
milestone. Once this is done, only the bridge remains as a major part that's not
at least shaped and recognizable. Here's the setup for marking the fret
locations. Readers over forty will appreciate the headband magnifier, for
reading the half-millimeter scale. The
ebony blank is flattened and thinned to 7/32" and the nut end is flat and
square to the edges. A block of wood is clamped to a plank to act as an end
stop, and the fingerboard blank is butted up against it. A ruler marked in
half-millimeters is also butted up to the stop and clamped down on the
fingerboard blank. The plans with the list of fret distances is handy, and so is
a can of caffeine-free diet Pepsi (you don't want shaky hands or a sugar high).
 A
knife is used to mark each fret position. This is just a nick, and will be gone
over with a square to make a clear cut mark across the board.
A
knife is used to mark each fret position. This is just a nick, and will be gone
over with a square to make a clear cut mark across the board.
 Here
I've marked the fret at 158.6616 mm from the nut. Just kidding. I aim for the
nearest quarter of a millimeter, since my scale is marked in half-millimeters.
Just a little nick with the knife at this point, and then take away the scale
and use the engineer's square to mark a fairly heavy knife cut straight across
the fretboard at each nick.
Here
I've marked the fret at 158.6616 mm from the nut. Just kidding. I aim for the
nearest quarter of a millimeter, since my scale is marked in half-millimeters.
Just a little nick with the knife at this point, and then take away the scale
and use the engineer's square to mark a fairly heavy knife cut straight across
the fretboard at each nick.
 This
fretting saw came from Stewart MacDonald. I've adjusted the side rider to the
depth I want the slots plus the thickness of the blade of the engineer's square,
so it stops cutting downward when the slot is 1/8" deep.
This
fretting saw came from Stewart MacDonald. I've adjusted the side rider to the
depth I want the slots plus the thickness of the blade of the engineer's square,
so it stops cutting downward when the slot is 1/8" deep.
I had a good deal of trouble with the saw binding in the slot while cutting
these. There is little or no set on this saw (the teeth of a saw are are
"set" by bending them to alternate sides of the blade to make the cut
a little wider than the thickness of the saw, to prevent binding). I smeared a
little Butcher's wax on the teeth of the saw, which helped, but it had to be
renewed after cutting every second fret. In one instance, the saw bound in the
slot, then bounded out of it, putting a deep gouge in the surface of the
fretboard.
 Here
the slotted board is ready for gluing. The rest of this page has few photos for
a lot of work, because I got into the work and neglected to take them. In
addition, many of the steps involve subtle changes in the contour of the surface
of the fingerboard, something it's a little difficult to get good pictures of!
I'll do my best to describe in words what's missing in the pics. After slotting
for the frets, the shape of the fingerboard is laid out on the fretboard blank
and the blank is cut down close to the line with the bandsaw and then trimmed to
shape with a plane.
Here
the slotted board is ready for gluing. The rest of this page has few photos for
a lot of work, because I got into the work and neglected to take them. In
addition, many of the steps involve subtle changes in the contour of the surface
of the fingerboard, something it's a little difficult to get good pictures of!
I'll do my best to describe in words what's missing in the pics. After slotting
for the frets, the shape of the fingerboard is laid out on the fretboard blank
and the blank is cut down close to the line with the bandsaw and then trimmed to
shape with a plane.
 C&N
say to cut slots for twenty frets and then cut off the fingerboard just past
where the twenty-first fret would go. Since I'm using a different plan than they
are, I was wary of blindly following this. I decided to cut the twenty
frets and get the thing glued to the neck and test-fitted to the box before
deciding where to cut it off. Besides, I thought I might want to try some kind
of treatment at the end of the fretboard. Stay tuned.
C&N
say to cut slots for twenty frets and then cut off the fingerboard just past
where the twenty-first fret would go. Since I'm using a different plan than they
are, I was wary of blindly following this. I decided to cut the twenty
frets and get the thing glued to the neck and test-fitted to the box before
deciding where to cut it off. Besides, I thought I might want to try some kind
of treatment at the end of the fretboard. Stay tuned.
Here the trimmed fretboard is being glued to the neck. The thick caul on top
is 3/4" plywood. It's intended to insure that uneven clamping pressure
doesn't introduce a curve into the assembly.
 This
block is clamped to the tenon to provide support for the overhanging part of the
fretboard during the fretboard radiusing and fretting operations. Here's where
the photos get pretty thin. For a better description than I can craft, see Cumpiano
& Natelson. In brief, the fingerboard top is shaped so that a smooth
curve that results in a difference of about 1/16th" between the sides and
the crown is planed in all along the fingerboard. Because the fingerboard is
wider at the body end than at the nut end, this results in the shape of part of
the surface of a cone, with the fingerboard running straight under each string.
C&N recommend final sanding after the frets are installed for beginners, but
say they final-sand first, and are careful when installing and shaping the
frets. So I say what the heck, I'll sand down to 320 grit before the frets go
in, and if I screw up I can always re-sand.
This
block is clamped to the tenon to provide support for the overhanging part of the
fretboard during the fretboard radiusing and fretting operations. Here's where
the photos get pretty thin. For a better description than I can craft, see Cumpiano
& Natelson. In brief, the fingerboard top is shaped so that a smooth
curve that results in a difference of about 1/16th" between the sides and
the crown is planed in all along the fingerboard. Because the fingerboard is
wider at the body end than at the nut end, this results in the shape of part of
the surface of a cone, with the fingerboard running straight under each string.
C&N recommend final sanding after the frets are installed for beginners, but
say they final-sand first, and are careful when installing and shaping the
frets. So I say what the heck, I'll sand down to 320 grit before the frets go
in, and if I screw up I can always re-sand.
Installing the frets goes smoothly -- again, not much to photograph about
this process. Frets come in a four-foot length of t-shaped wire, and you can cut
off a piece and gently tap the lower part of the T into the fret slot. Or, you
can hold the end of the wire to the slot and tap it in, and then cut it off.
After fumbling around with the first process for a while I settled on the
second. You cut it with a strong pair of wire-cutting pliers -- it's pretty
thick and it takes a good strong squeeze.
After all the frets are installed, the cut ends are hanging over the edge,
and they need to be filed flush to the side of the fingerboard. If you trimmed
the side of the neck blank right down to the line before this, you've made a
mistake -- the file rides nicely on this overhang while staying vertical to eat
away the fret ends flush to the ebony. When the ends are flush, the file is
tilted and run along the ends of the frets to put a 30-degree angle on the ends
of the fret beads (the bead being the visible part of the installed fret wire,
while the tang is the part inside the slot).
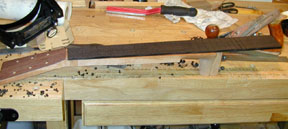
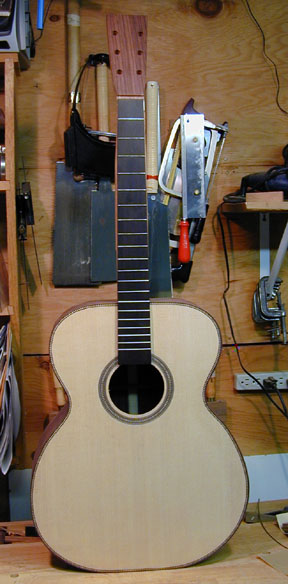 As
you can see here, I've cut off the end of the fingerboard a little generously;
I'm still deciding what to do with the end.
As
you can see here, I've cut off the end of the fingerboard a little generously;
I'm still deciding what to do with the end.
I am tremendously psyched by the end of today's work I swear I eat up more time
sticking the neck back on the box for photo-ops than I do building. Not quite
true, but what the heck. It helps morale to sit back and see the progress you've
made.
Previous Next
Home
Road Map Resources
Lutherie Tools
Copyright © 2001 Stephen Miklos