 One
last test fit before pounding in the tuning pins and bridges. I did trim just a
little off the bottom of the pillar.
Time to add the hardware and string it up.
One
last test fit before pounding in the tuning pins and bridges. I did trim just a
little off the bottom of the pillar.
Time to add the hardware and string it up.
I glued the overlays on the neck and pillar without unexpected consequences. Test-fitting the assembly to the soundbox, I trimmed and shaved a little to get a good fit. I've declared the construction complete. Now what remains is applying a finish to the wooden parts, adding the hardware pieces (tuning pins, bridge pins, sharping levers, soundboard grommets), and stringing it up. Apart from two screws in the base that hold the end of the pillar to the soundbox, the neck/pillar assembly is held tightly to the soundbox by the tension of the strings. The end of the neck is not fastened to the soundbox at all.
For a finish I decided to try Behlen's Qualasole, based on the recommendation of Deb Suran of the Musical Instrument Makers' Forum. It's a "padding lacquer" that, according to a string of her postings in the MIMF, is quite a bit easier to use than French Polish, and also a little more durable. I presume there's no free lunch, and that it's not quite as fine a finish as the French Polish. That's neither here nor there, as I don't want a high gloss like on a guitar. I'm not going to fill the pores on the walnut (the maple wouldn't need it anyway), to get a more rustic, woody look.
I wanted a rub-on, not a brush-on finish, and one that is finished quickly. The Somerset Folk Harp Festival, where I'm going to deliver this harp to its owner (my Mother-in-law) is a mere nine days away! Also, I was tipped off by the MIMF thread that an oil finish -- the usual obvious choice for a fast, rubbed-on finish -- might play havoc with the tuning pegs, which depend on friction to hold their tension. A little uncured oil in one of those holes would be a nightmare. Deb Suran makes hammered dulcimers, which use the same tuning pins as this harp, and reports good results with the Qualasole. I located a single lonely bottle of this potion at the local Woodcraft/Woodworkers' Club, and did a test on a piece of each of the three main woods -- maple, walnut (sounds like an ice cream cone), and birch. It goes on nicely and looks well, even with only a single coat.
Tonight I spent two and a half hours sanding and applying a first coat of Qualasole to the neck and pillar assembly. It went well, and at least for a first coat, it looks pretty good.
I highly recommend the Musical Instrument Makers' Forum if you're a builder or thinking about building an instrument of any kind. You can browse the forum without even signing up, and if you're a member (membership is currently free), you have access to the library of past discussions, which is where I always go when in doubt about a procedure, tool, or material. That's where I found the thread about Qualasole.
Time Today: 2.5 hours. Total so far: 25.0 hours
One
last test fit before pounding in the tuning pins and bridges. I did trim just a
little off the bottom of the pillar.
Time to add the hardware and string it up.
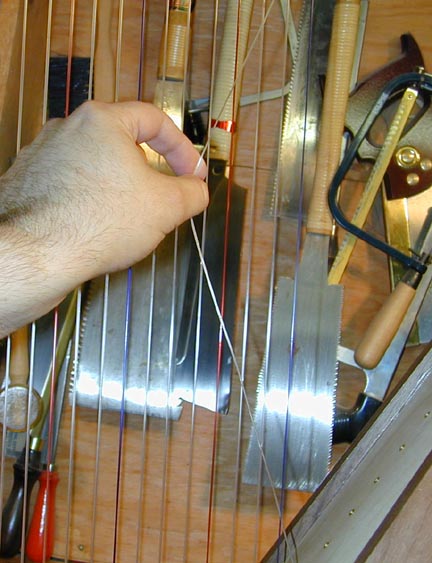
 The
bridges are small brass pins with notches that keep the strings at a uniform
height on the neck. This depends on their being installed at a uniform height.
The block shown here is 1/2 inch thick one way for the bridge pins, and 1"
the other way for the tuning pins. Both types of pins are installed by whacking
them in with a hammer, so I just hold the block next to the pin and whack away
until the hammer touches the block. This keeps the pins at the right height and
provides some protection for the finish on the neck from errant hammer
blows.
The
bridges are small brass pins with notches that keep the strings at a uniform
height on the neck. This depends on their being installed at a uniform height.
The block shown here is 1/2 inch thick one way for the bridge pins, and 1"
the other way for the tuning pins. Both types of pins are installed by whacking
them in with a hammer, so I just hold the block next to the pin and whack away
until the hammer touches the block. This keeps the pins at the right height and
provides some protection for the finish on the neck from errant hammer
blows.

These are the tuning pins. Musicmakers' supplies five pins with enlarged string holes to accommodate the lowest (.060") strings.
The microthreaded "zither pins" are looked down upon by some harpies, but they do have some defenders. See William Rees's opinion here. For my money, I will go with tapered pins in the future, as the zither pins are really only good in hard maple or maple plywood "wrest plate" material. I'm not crazy about working with maple, or with being limited to it. The traditional tapered pins are good with just about any hardwood, though I'd be dubious about, say, mahogany.
 Small
brass grommets are inserted into the string holes in the soundboard, to protect
the wood from the strings.
Small
brass grommets are inserted into the string holes in the soundboard, to protect
the wood from the strings.

The strings are poked up through the soundboard holes (and the grommets). For the thickest strings, a simple overhand knot is sufficient to keep the string from coming through the hole. A drop of superglue on the knot insures that it won't come undone.

The strings coming up through the holes...
 Here
the first five strings have been strung. You can already see the soundboard
starting to "belly up" from the tension. This is expected. Someone
somewhere said that an instrument doesn't sound its best until it is just on the
verge of self-destructing. A harp sure looks like that when it's fully
tensioned.
Here
the first five strings have been strung. You can already see the soundboard
starting to "belly up" from the tension. This is expected. Someone
somewhere said that an instrument doesn't sound its best until it is just on the
verge of self-destructing. A harp sure looks like that when it's fully
tensioned.
 The
neck is held in place on the top of the soundbox simply by the tension of the
strings. Until enough strings are mounted, the neck can slip around up here. A
strip of masking tape marks where the centerline ought to be.
The
neck is held in place on the top of the soundbox simply by the tension of the
strings. Until enough strings are mounted, the neck can slip around up here. A
strip of masking tape marks where the centerline ought to be.
 After
the thickest strings are on, the next set need a little help to keep from being
sucked through the holes in the soundboard. This is just an overhand knot with
the loose end poked through the loop. Again, a drop of superglue insures the
knot.
After
the thickest strings are on, the next set need a little help to keep from being
sucked through the holes in the soundboard. This is just an overhand knot with
the loose end poked through the loop. Again, a drop of superglue insures the
knot.
 From
the third size on down to the smallest size, a small bead helps to keep the knot
inside the soundbox.
From
the third size on down to the smallest size, a small bead helps to keep the knot
inside the soundbox.
How much slack do you leave to be taken up on the tuning pin? This much. I leave enough slack to pull the string over past five of the previously-mounted strings. For the first five, I eyeball it.
Well, the harp is strung. Right now, tuning takes longer than it holds. It will have to be tuned up twenty times before it's stable enough to accurately place the levers.
Time: During several sessions during the week, I spent a total of 4 hours on sanding and finishing (beyond what I had done as of the last report). Today, I spent four more hours final-fitting, installing the hardware, and stringing.
Total time so far: 33 hours.
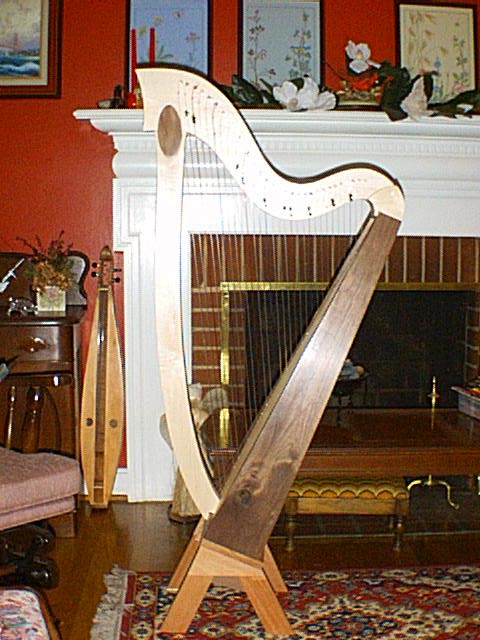 I
built the legs shown here on the morning before we left for the Somerset Folk
Harp Festival, and the levers on the B, C, and F strings were installed in my
hotel room at Somerset! My mother-in-law Nell met us at the festival to take
delivery of this, her first harp.
I
built the legs shown here on the morning before we left for the Somerset Folk
Harp Festival, and the levers on the B, C, and F strings were installed in my
hotel room at Somerset! My mother-in-law Nell met us at the festival to take
delivery of this, her first harp.
I had hoped to photograph the steps of installing the levers, but alas, time ran out. It's a fussy job, and it's hard to find information on doing it (even from the folks that sold me the levers!) Perhaps on a later project I'll be able to document it.
I'm not crazy about the legs, but they do the job. The photograph is by Nell.
The mountain dulcimer in the background is an earlier project of mine.
Copyright © 2002 Stephen Miklos