Home
Road Map Resources
Lutherie Tools
Weekend 4: March 26 - April 1
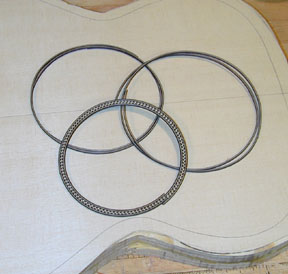
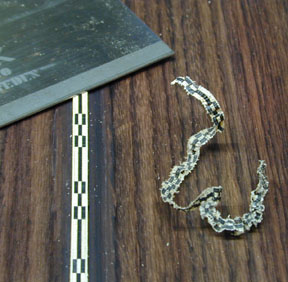
The Rosette from the LMI boxed materials set comes in three parts: two
35" strips of dark/light/dark veneer sandwich about 1/16" thick and
1/8" wide (the dark/light/dark shows on the 1/16" face), and a
pre-formed circle of Martin-style herringbone purfling 1/4" wide and about
4" inside diameter. The ring is a little more than a full circle in its
relaxed state, that is, it is not joined and the ends overlap, so it can be
inlaid at that size with a little cut off the end, or pulled open to a larger
size. The procedure is to rout a channel in the face of the top, surrounding the
intended location of the soundhole, and to inlay the strips and the purfling
ring into the channel. Well, that's how it came out. The intention was to rout a
1/8" channel for one double circle of veneer strip, then 1/8" further
out, a 1/4" channel for the purfling, and then another gap and another
1/8" channel for veneer strips.
I began by following the figures in Cumpiano
and Natelson, starting with a 4" soundhole, 1/8" of wood, an
1/8" veneer strip ring, and so forth. When I routed the channel for the
purfling ring, I naturally tried it for fit. It would not open out that wide.
The most it would do was a 4-1/4" diameter, and I was asking it for another
1/8" beyond that, which was enough to leave a wide gap that would not be
covered by the end of the fingerboard. I retrenched, and routed down the wood
between the first and second channels, leaving a 1/2" channel into which I
would inlay all three parts of the rosette. It came out fine; but next time I'll
measure all my materials before working on any of them!
The process in the pictures, then, shows the start of a three-piece rosette
ring that finishes as a one-piece. If you see anything odd, that probably
explains it!
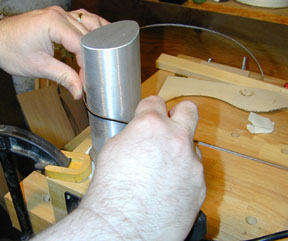 The
veneer strips are too brittle to bend into a ring, so they need to be
pre-shaped. Cumpiano
and Natelson suggest soaking in hot water, then bending into a prepared
mold with channels the same size as those in the top. I didn't have anything
long enough to soak them in, and carrying hot water downstairs would be a
problem anyway. I decided to try one of the specialist tools I got for this
project: a bending iron (click
here for the tool description). I soaked the first few inches of the strip
in a bowl of cool water, then worked the strip against the iron. The iron was
hot enough to sizzle the water, and the strip bent readily. As you can see here,
I fed the strip in with my right hand and pulled it around the iron with my
left. All it took was about two seconds sliding back and forth by about
1/2" at the contact point, and then moving over to the left another
1/2".
The
veneer strips are too brittle to bend into a ring, so they need to be
pre-shaped. Cumpiano
and Natelson suggest soaking in hot water, then bending into a prepared
mold with channels the same size as those in the top. I didn't have anything
long enough to soak them in, and carrying hot water downstairs would be a
problem anyway. I decided to try one of the specialist tools I got for this
project: a bending iron (click
here for the tool description). I soaked the first few inches of the strip
in a bowl of cool water, then worked the strip against the iron. The iron was
hot enough to sizzle the water, and the strip bent readily. As you can see here,
I fed the strip in with my right hand and pulled it around the iron with my
left. All it took was about two seconds sliding back and forth by about
1/2" at the contact point, and then moving over to the left another
1/2".
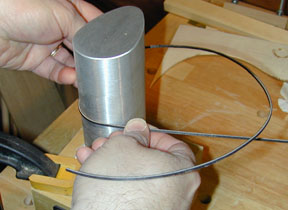 Because
I needed two circles on either side of the herringbone, I just continued curving
the whole 35" strip, and then curved the other strip.
Because
I needed two circles on either side of the herringbone, I just continued curving
the whole 35" strip, and then curved the other strip.
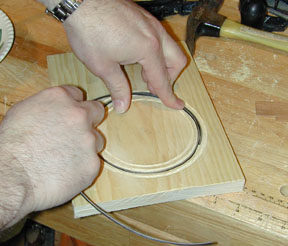 I
had prepared a board by routing the channels I thought I was going to use, and
used this as a mold to let the curved stripping set.
I
had prepared a board by routing the channels I thought I was going to use, and
used this as a mold to let the curved stripping set.
 With
the strips loaded in the mold, I placed another board over them to keep them
from popping up, and put them aside overnight.
With
the strips loaded in the mold, I placed another board over them to keep them
from popping up, and put them aside overnight.
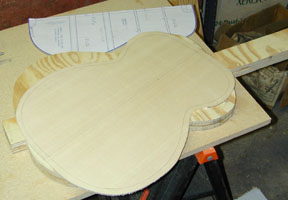 I
used the template I had made by gluing the plan cutout to a board to trace the
outline of the top onto the spruce sheet from the materials. I then cut the
shape of the guitar top out of the sheet, leaving a 1/2" border all
around.
I
used the template I had made by gluing the plan cutout to a board to trace the
outline of the top onto the spruce sheet from the materials. I then cut the
shape of the guitar top out of the sheet, leaving a 1/2" border all
around.
The materials come with the top wood in two "bookmatched" pieces;
that is, they are two consecutive slices from the same log. To bookmatch the
pieces, you place them in the orientation they had in the log, then open them
like a book and glue the two near edges together. It yields a symmetrical grain
pattern, and, for an instrument soundboard, a symmetrical wood structure. When
you order a top, you can have LMI sand them to a given thickness and glue
the pieces together. These operations are tedious and they require either
extreme skill with a plane or a heavy-duty thickness sander, so I opted to pay
for the thicknessing and joining to be done for me. I also had them thickness
and join the back, and thickness the sides.
This top is made of Sitka spruce, a wood native to the American Northwest. It
has a very high strength to weight ratio and acoustic characteristics that make
it the most popular wood for steel-string guitar soundboards. When I "tap
test" the top wood by holding it near the edge and rapping it with a
knuckle of my other hand, it has a bell-like sound. It is a beautiful piece of
wood. I'm now about to take a chance at not wrecking it.
I agonized for a while about how to put the channels in the top for the
soundhole rosette. I thought of grinding a special cutter for a fly
cutter, but the one I have isn't big enough, and besides, if you look at it,
it seems awfully risky. The thought of modifying my Porter-Cable router to cut
circles as recommended in Cumpiano
and Natelson didn't appeal to me. That's a lot of
horsepower against the delicate spruce of the top. LMI offers a specialized
router harness for a Dremel tool that does all kinds of magic for lutherie...but
it's 125 clams, and I've already spent a lot on this project. In addition to
which, LMI takes forever to ship anything.
 Then
I noticed the lowly plastic router base I had gotten for my Dremel long ago. If
you take away the fence from the router fence attachment, and leave the part
that rides on the rails, you find that that part rides level with the bottom of
the router base, and it contains a hole right through the center of it that
perfectly accommodates a 1-1/2" finishing nail or brad. Swiveling on this
nail, it becomes an excellent circle cutter. I bet it's even described in the
instructions for the Dremel router base that I never read. I tried it out on the
scrap board that became the mold for holding the veneer strips to set in their
curved shape.
Then
I noticed the lowly plastic router base I had gotten for my Dremel long ago. If
you take away the fence from the router fence attachment, and leave the part
that rides on the rails, you find that that part rides level with the bottom of
the router base, and it contains a hole right through the center of it that
perfectly accommodates a 1-1/2" finishing nail or brad. Swiveling on this
nail, it becomes an excellent circle cutter. I bet it's even described in the
instructions for the Dremel router base that I never read. I tried it out on the
scrap board that became the mold for holding the veneer strips to set in their
curved shape.
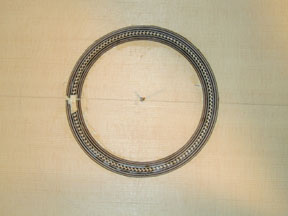
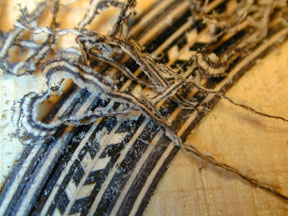
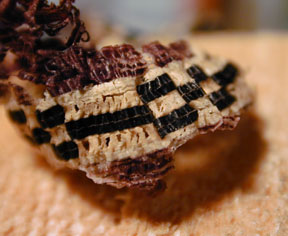
 The
rings come out of the mold on Sunday morning quite content to be rings. They are
shown here with the LMI-supplied herringbone rosette. Using the Dremel tool
circle cutter, I cut the first 1/8" channel and fit the smaller veneer
strip rings into it, cutting the strip to make two separate rings so as not to
have a bump where they overlap. Then the 1/4" channel for the purfling,
when I notice that the purfling ring won't stretch to fit it. After shaving down
the wood between the two rings, I have approximately a 1/2" channel. I rout
down against the inner circumference of this channel, shaving about a 32nd of an
inch each time, until all the rings fit into this channel.
The
rings come out of the mold on Sunday morning quite content to be rings. They are
shown here with the LMI-supplied herringbone rosette. Using the Dremel tool
circle cutter, I cut the first 1/8" channel and fit the smaller veneer
strip rings into it, cutting the strip to make two separate rings so as not to
have a bump where they overlap. Then the 1/4" channel for the purfling,
when I notice that the purfling ring won't stretch to fit it. After shaving down
the wood between the two rings, I have approximately a 1/2" channel. I rout
down against the inner circumference of this channel, shaving about a 32nd of an
inch each time, until all the rings fit into this channel.
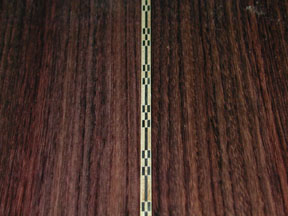
 Here's
the result, messed up with glue squeeze-out. The gap in the herringbone ring
will be covered by the end of the fingerboard.
Here's
the result, messed up with glue squeeze-out. The gap in the herringbone ring
will be covered by the end of the fingerboard.
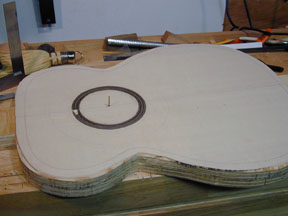 It
begins to look like part of a guitar, no?
It
begins to look like part of a guitar, no?
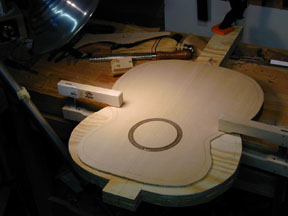 Now
the glue has dried, and the rings must be scraped level with the soundboard. I
clamp the top to the workboard -- backwards, so as to have the soundhole close
to me -- and set up a light so I can see the high spots as I work. I'll use the
scraper rather than a plane or an abrasive, because the scraper is easier to
control than the plane, and I want to scrape the rings without too much scraping
the top, and an abrasive might drive dark-colored dust from the ring material
into the light top wood.
Now
the glue has dried, and the rings must be scraped level with the soundboard. I
clamp the top to the workboard -- backwards, so as to have the soundhole close
to me -- and set up a light so I can see the high spots as I work. I'll use the
scraper rather than a plane or an abrasive, because the scraper is easier to
control than the plane, and I want to scrape the rings without too much scraping
the top, and an abrasive might drive dark-colored dust from the ring material
into the light top wood.
 The
scraper takes fine shavings from the ring material. Soon the rings are level
with the top surface. This took about ten minutes of scraping. After scraping,
the area is smoothed with 120-grit sandpaper on a block, and then lightly
scraped again to remove any dark material from the spruce.
The
scraper takes fine shavings from the ring material. Soon the rings are level
with the top surface. This took about ten minutes of scraping. After scraping,
the area is smoothed with 120-grit sandpaper on a block, and then lightly
scraped again to remove any dark material from the spruce.
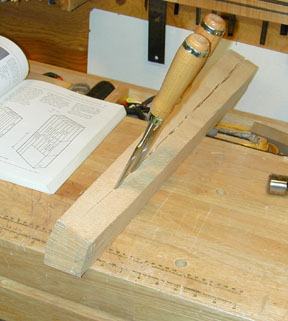
 If
you use a fly cutter to take out the soundhole, don't be alarmed when the
soundhole climbs up the drill bit as it cuts through!
If
you use a fly cutter to take out the soundhole, don't be alarmed when the
soundhole climbs up the drill bit as it cuts through!
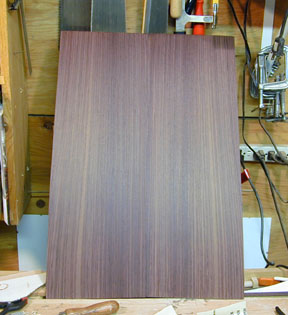 The
next step in Cumpiano
and Natelson is to do the top braces, but I have the Dremel-router out
and I know I eventually have to inlay the decorative back strip. Here is the
gorgeous East Indian Rosewood back material. I really don't want to mess this
up. You can see the results of bookmatching on this piece: the light, slightly
curved figure streak about 1/6 of the way from the edge repeats in mirror image
on the other side. The material for the sides is closely matched to the back in
color and figure. Luthier's Mercantile Inc.
promises first grade materials in the boxed set, and in my admittedly
inexperienced opinion, they certainly deliver.
The
next step in Cumpiano
and Natelson is to do the top braces, but I have the Dremel-router out
and I know I eventually have to inlay the decorative back strip. Here is the
gorgeous East Indian Rosewood back material. I really don't want to mess this
up. You can see the results of bookmatching on this piece: the light, slightly
curved figure streak about 1/6 of the way from the edge repeats in mirror image
on the other side. The material for the sides is closely matched to the back in
color and figure. Luthier's Mercantile Inc.
promises first grade materials in the boxed set, and in my admittedly
inexperienced opinion, they certainly deliver.
LMI offers two grades of boxed materials for steel string guitar, differing
mainly in one having mahogany back and sides and the other rosewood. The other
differences are in the ritzier decorative materials in the rosewood set. The
rosewood set comes with Martin-28-style herringbone purfling and rosette, and
the back strip features an elongated checker pattern of maple and rosewood
pieces. Picture a little further down!
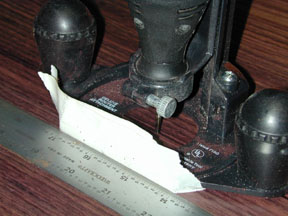
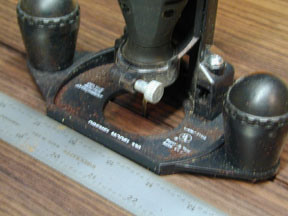 The
Dremel router base comes through again, with one flat edge offering the perfect
bearing surface for routing a long straight groove by following a long
straightedge. I'll retake this picture another time -- it's a little shaky. I
find that not using the flash I get better colors, but I really have to steady
the camera with a tripod or some other support...I skipped that this time
The
Dremel router base comes through again, with one flat edge offering the perfect
bearing surface for routing a long straight groove by following a long
straightedge. I'll retake this picture another time -- it's a little shaky. I
find that not using the flash I get better colors, but I really have to steady
the camera with a tripod or some other support...I skipped that this time
Routing a long straight groove to take the decorative strip that disguises
the joint between the two halves of the back. The strip is about 3/16"
wide. In order to get a snug fit, I start with a 1/8" router bit.
 The
initial try at routing to full depth sends up smoke, so I back off the depth a
bit, and take about .02" at a time. Any more than that burns badly. This
rosewood is dense, which makes it a stiff and resonant reflector of sound. After
getting to about .07 inches (the material is .11) I need to increase the width
of the groove. This I do by adding successive layers of tape to the bearing edge
of the router base. This adds less than 1/64" at a time, so I am sure I
will not go over and get a sloppy fit.
The
initial try at routing to full depth sends up smoke, so I back off the depth a
bit, and take about .02" at a time. Any more than that burns badly. This
rosewood is dense, which makes it a stiff and resonant reflector of sound. After
getting to about .07 inches (the material is .11) I need to increase the width
of the groove. This I do by adding successive layers of tape to the bearing edge
of the router base. This adds less than 1/64" at a time, so I am sure I
will not go over and get a sloppy fit.
 Here's
what I meant by "elongated checkerboard". The strip is glued into the
groove and I'm scraping it down. You know you've learned to sharpen a scraper
when you get curls like this. I saved a bowlful of them to make people guess
what they are. The discoloration on either side of the strip is from acetone
that I wiped into the groove (and slopped over). I did that on the advice of a
book called "A Guitarmaker's Manual" by Jim Williams. Seems the oils
in rosewood can keep glue from adhering properly. Wiping with a paper towel
lightly moistened with acetone certainly brings a lot of gunk out of the wood,
and a bright purple color. Cumpiano
and Natelson don't mention this. I worry about the
discoloration, but it scrapes away once I get the strip down.
Here's
what I meant by "elongated checkerboard". The strip is glued into the
groove and I'm scraping it down. You know you've learned to sharpen a scraper
when you get curls like this. I saved a bowlful of them to make people guess
what they are. The discoloration on either side of the strip is from acetone
that I wiped into the groove (and slopped over). I did that on the advice of a
book called "A Guitarmaker's Manual" by Jim Williams. Seems the oils
in rosewood can keep glue from adhering properly. Wiping with a paper towel
lightly moistened with acetone certainly brings a lot of gunk out of the wood,
and a bright purple color. Cumpiano
and Natelson don't mention this. I worry about the
discoloration, but it scrapes away once I get the strip down.
 I
had to get in my weekly macro photo of a curl of wood. This came from the
scraper, not the plane, and it shows the rosewood having no trouble adhering to
the glue that sticks it to the back strip.
I
had to get in my weekly macro photo of a curl of wood. This came from the
scraper, not the plane, and it shows the rosewood having no trouble adhering to
the glue that sticks it to the back strip.
 And
here's the result.
And
here's the result.
 And
now for something completely different. The wood for making the braces that help
to strengthen and stiffen the underside of the top comes in a billet split right
from a log. As you can see, it is split along the radial lines of the fibers of
the wood. To make braces that will have the best acoustic properties and
greatest strength, you should have wood that has no run-out of the grain, i.e.,
the fibers should continue through the piece to the greatest extent possible
given the shape of the piece. The way to get that is to split the material along
the grain down to the approximate dimensions of the piece, and then saw and
plane to the final dimensions.
And
now for something completely different. The wood for making the braces that help
to strengthen and stiffen the underside of the top comes in a billet split right
from a log. As you can see, it is split along the radial lines of the fibers of
the wood. To make braces that will have the best acoustic properties and
greatest strength, you should have wood that has no run-out of the grain, i.e.,
the fibers should continue through the piece to the greatest extent possible
given the shape of the piece. The way to get that is to split the material along
the grain down to the approximate dimensions of the piece, and then saw and
plane to the final dimensions.
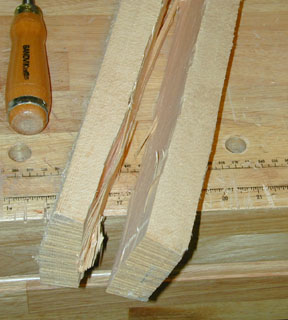
The normal way to do this would be with a froe, a specialized tool for
splitting wood. It has a long blade with a handle mounted perpendicular to it.
You drive the blade into the end grain of the billet, then pull the handle to
the side to turn the blade and widen the crack. I found Sunday afternoon not
quite done when I glued in the back strip, so I went over to the Woodworkers'
Club to see if they had a froe. They carry two models, an out-in-the-woods
he-man one and a small one for splitting basket strips. I figured on the small
one. Well, they didn't have either one, so I settled on the method pictured. I
started a crack about where I wanted it by driving a chisel deep into the side
of the billet near the end, then walked the crack down the billet by
leapfrogging two chisels down the crack. Apart from having whacked my thumb
four or five times, it worked like a charm.
 Having
accomplished this glorious split, I decided to call it a day. Actually, I went
back and scraped the back strip down as described above, now that the glue was
set, but that's telling the tale out of turn. Next week, I'll lay out the
bracing pattern and make the braces and maybe get them glued onto the
soundboard.
Having
accomplished this glorious split, I decided to call it a day. Actually, I went
back and scraped the back strip down as described above, now that the glue was
set, but that's telling the tale out of turn. Next week, I'll lay out the
bracing pattern and make the braces and maybe get them glued onto the
soundboard.
Previous Next
Home
Road Map Resources
Lutherie Tools
Copyright © 2001 Stephen Miklos