Home
Road Map Resources
Lutherie Tools
Week 9: May 7 - 20
Most of the work on this page was done May 7 and 8, as I got sick during the
week and really couldn't do anything the following weekend.
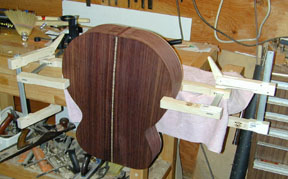
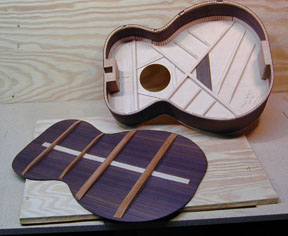 After
the outline of the sides is marked on the back, the waste is trimmed to within a sixteenth
of an inch of the line. The box is cleaned out and the box and back are set up
for a last photo opportunity. I hope I haven't forgotten anything! You can see
my signature and the date scrawled into the lower treble side of the soundboard.
After
the outline of the sides is marked on the back, the waste is trimmed to within a sixteenth
of an inch of the line. The box is cleaned out and the box and back are set up
for a last photo opportunity. I hope I haven't forgotten anything! You can see
my signature and the date scrawled into the lower treble side of the soundboard.
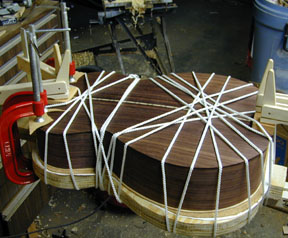 I
bought some stuff at a surgical supply store that I thought would work in lieu
of strips of inner tube, inner tubes being scarce these days of tubeless tires.
It was a thin elastic material about six inches wide, intended for use in
exercises for physical therapy. I cut a third off the roll, making it a two-inch
strip, and tried wrapping the back down to the sides without glue and everything seemed
quite alright. When I got the glue on, however, and started to wrap it again,
the material kept breaking, to the point where I gave up on it with the glue
sitting there drying. Plan B was nylon rope. I think this worked out well --
though as I write this the jury's still out, since the box is still tied up like
this. Because the rope wouldn't cover every inch of the back the way an elastic
material could, I added a couple of clamps just tight enough to bring the back
edge into contact in the two places on the upper bout where it was a problem.
I
bought some stuff at a surgical supply store that I thought would work in lieu
of strips of inner tube, inner tubes being scarce these days of tubeless tires.
It was a thin elastic material about six inches wide, intended for use in
exercises for physical therapy. I cut a third off the roll, making it a two-inch
strip, and tried wrapping the back down to the sides without glue and everything seemed
quite alright. When I got the glue on, however, and started to wrap it again,
the material kept breaking, to the point where I gave up on it with the glue
sitting there drying. Plan B was nylon rope. I think this worked out well --
though as I write this the jury's still out, since the box is still tied up like
this. Because the rope wouldn't cover every inch of the back the way an elastic
material could, I added a couple of clamps just tight enough to bring the back
edge into contact in the two places on the upper bout where it was a problem.
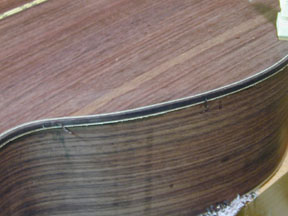
 Well,
it came out all right. There are no gaps visible between the back material and
the side material. There was a small problem that I will describe later when a
picture of it comes up. I used an edge-trimming bit in a laminate trimmer -- a
tool that's halfway between a router and a Dremel moto-tool in size and kick --
to chew away the remaining overhang on the top. The back was trimmed closely
enough before gluing. The next step is to install the end graft, a piece that
joins the two ends of the side material as they meet at the bottom end of the
guitar. The sides meet (theoretically) in the neck at the other end, so no
treatment is needed there. First a pair of saw cuts are made and the side
material chiseled away between them, right down to the bare wood of the
tailblock.
Well,
it came out all right. There are no gaps visible between the back material and
the side material. There was a small problem that I will describe later when a
picture of it comes up. I used an edge-trimming bit in a laminate trimmer -- a
tool that's halfway between a router and a Dremel moto-tool in size and kick --
to chew away the remaining overhang on the top. The back was trimmed closely
enough before gluing. The next step is to install the end graft, a piece that
joins the two ends of the side material as they meet at the bottom end of the
guitar. The sides meet (theoretically) in the neck at the other end, so no
treatment is needed there. First a pair of saw cuts are made and the side
material chiseled away between them, right down to the bare wood of the
tailblock.
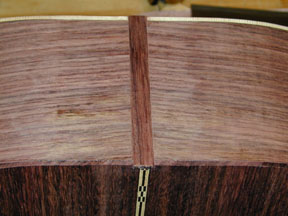
 The
saw cuts are slightly further apart at the soundboard side than at the back
side, so that a slightly wedge-shaped piece will fit in tightly, leaving no
visible gaps. Sometimes this is done to the wedge-shape is obvious; I decided to
make it only very slight. The end graft is a piece of cutoff from the back
material. It is fit by taking a plane stroke or two on each side until it can
slide all the way down into the slot, fitting snugly.
The
saw cuts are slightly further apart at the soundboard side than at the back
side, so that a slightly wedge-shaped piece will fit in tightly, leaving no
visible gaps. Sometimes this is done to the wedge-shape is obvious; I decided to
make it only very slight. The end graft is a piece of cutoff from the back
material. It is fit by taking a plane stroke or two on each side until it can
slide all the way down into the slot, fitting snugly.
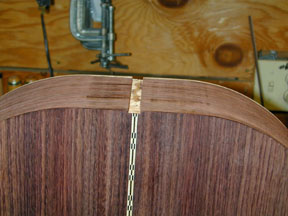
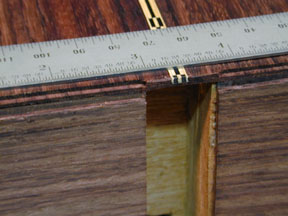
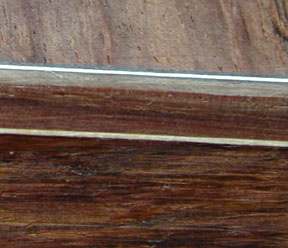
As you can see in this photo, there was a slight movement of the back while
roping it down, putting the back center stripe between a thirty-second and a
sixteenth off-center. Though it's obvious here, the back binding will come
between the end graft and the stripe, so I hope it won't be noticeable. The two
parts of the binding will meet here, so I'll try to make the meeting line up
with the strip to further confound the eye.
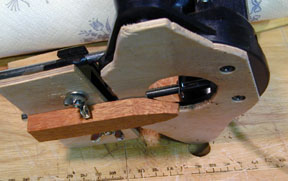
 Here's
the scary setup I used to hold the box while doing this procedure. It's similar
to the one in Cumpiano and Natelson. I'm going to think of something better. Actually, I saw a
setup in The Big Red Book of American Lutherie, a collection of articles from
the magazine of the Guild of American Luthiers, that I'll probably use.
Here's
the scary setup I used to hold the box while doing this procedure. It's similar
to the one in Cumpiano and Natelson. I'm going to think of something better. Actually, I saw a
setup in The Big Red Book of American Lutherie, a collection of articles from
the magazine of the Guild of American Luthiers, that I'll probably use.
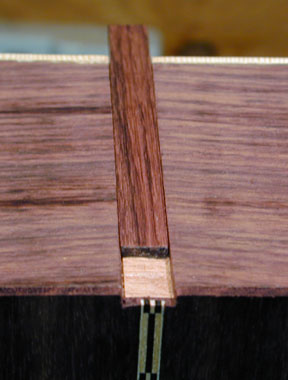
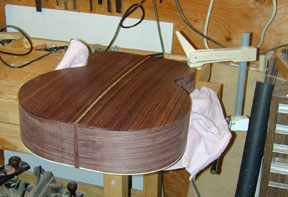
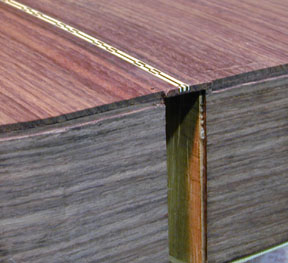
 Here's
the end graft installed.
Here's
the end graft installed.
 Here's
my bench setup for routing the binding ledges. The guitar box is held between
two bench dogs which are hidden under the plush towel that protects the box.
Because the end hangs off the front of the bench, I've lightly clamped the upper
bout. After routing up to the waist on both sides, I'll turn the box around and
rout the upper bout.
Here's
my bench setup for routing the binding ledges. The guitar box is held between
two bench dogs which are hidden under the plush towel that protects the box.
Because the end hangs off the front of the bench, I've lightly clamped the upper
bout. After routing up to the waist on both sides, I'll turn the box around and
rout the upper bout.
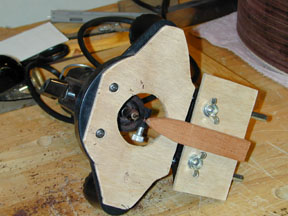 This
"design" for a binding-ledge routing setup comes roughly from the
Donald Brosnac book that first inspired me with the notion of guitar building so
long ago. I say roughly, because I didn't go back to the book to refresh my
memory, but I must say I nearly memorized that book back in the late seventies.
Forgive the multiple photos here; I didn't get one that seemed to explain the
whole thing.
This
"design" for a binding-ledge routing setup comes roughly from the
Donald Brosnac book that first inspired me with the notion of guitar building so
long ago. I say roughly, because I didn't go back to the book to refresh my
memory, but I must say I nearly memorized that book back in the late seventies.
Forgive the multiple photos here; I didn't get one that seemed to explain the
whole thing.
I used the basic Dremel router base as a starting point, removing the fence
from its mounting as with the circle-cutting setup. I used the screws that hold
the fence mount to the rail to attach a piece of 1/4" plywood to which was
mounted the "finger" that will bear against the guitar side. By
keeping the finger pointing perpendicular to the tangent to the curve of
the guitar's side at every point, a consistent depth of cut is maintained. This
is easier than it sounds, especially if you slept through high-school
geometry.
 I
am using the LMI 1/8" down cut end mill. I originally tried this with a
regular Dremel router bit, but the cut was very rough. The end mill was too long
for the router base -- at the setting for the shortest cut possible, it stuck
out more then the depth of the binding. To solve this I added the
1/4" ply base plate to take up some of the slack. I used the screws that
hold the Dremel base plate to the tool-holding mechanism or superstructure --
very convenient! I had to countersink the holes for the screws so they wouldn't
ride on the guitar surface..
I
am using the LMI 1/8" down cut end mill. I originally tried this with a
regular Dremel router bit, but the cut was very rough. The end mill was too long
for the router base -- at the setting for the shortest cut possible, it stuck
out more then the depth of the binding. To solve this I added the
1/4" ply base plate to take up some of the slack. I used the screws that
hold the Dremel base plate to the tool-holding mechanism or superstructure --
very convenient! I had to countersink the holes for the screws so they wouldn't
ride on the guitar surface..
3.JPG) The
end of the finger is based on a circle whose diameter is larger than the
diameter of the bit. Therefore, if you point the finger a little bit off the
perpendicular to the tangent, it cuts a little more shallowly rather than more
deeply. This is good just for safety reasons but also because when the depth of
cut is more than half the diameter of the cutter the wood can split away when
cutting along the grain. I didn't know this ahead of time, but discovered it
through experience. After that I began taking a first cut with the finger
pointed 25% off to the side, then finishing with the finger perpendicular. I may
get a bigger cutter.
The
end of the finger is based on a circle whose diameter is larger than the
diameter of the bit. Therefore, if you point the finger a little bit off the
perpendicular to the tangent, it cuts a little more shallowly rather than more
deeply. This is good just for safety reasons but also because when the depth of
cut is more than half the diameter of the cutter the wood can split away when
cutting along the grain. I didn't know this ahead of time, but discovered it
through experience. After that I began taking a first cut with the finger
pointed 25% off to the side, then finishing with the finger perpendicular. I may
get a bigger cutter.
 Here's
step one of the routing, the ledge for the binding strip. I'm going to put a
small purfling band in as well, a piece of the black-white-black veneer strip.
This will take another, shallower ledge which you'll see in the next photo. Here
you can see the unrouted nib over the mortise. There's nothing for the finger to
bear on there, so it will have to be taken down with a chisel.
Here's
step one of the routing, the ledge for the binding strip. I'm going to put a
small purfling band in as well, a piece of the black-white-black veneer strip.
This will take another, shallower ledge which you'll see in the next photo. Here
you can see the unrouted nib over the mortise. There's nothing for the finger to
bear on there, so it will have to be taken down with a chisel.
 Here
you can see the second ledge and the nib left by that routing. To remove this
nib I place the ruler along the cuts on either side and score the wood several
times with a knife to establish the back edge, then clip it off with a chisel
into the end grain. This bit is too small to use a chisel freehand with, as I
did the first nib above.
Here
you can see the second ledge and the nib left by that routing. To remove this
nib I place the ruler along the cuts on either side and score the wood several
times with a knife to establish the back edge, then clip it off with a chisel
into the end grain. This bit is too small to use a chisel freehand with, as I
did the first nib above.
 Both
the veneer strip and the binding strip are too brittle and stiff to simply glue
on, so both are bent against the bending iron first. This proves difficult with
the binding strip, because it is far from straight-grained. At one point I broke
the strip clean through, with the grain running at 45 degrees across the strip.
I found that using a block of wood against the back of the strip right at the
point of bending helped to keep it from splitting.
Both
the veneer strip and the binding strip are too brittle and stiff to simply glue
on, so both are bent against the bending iron first. This proves difficult with
the binding strip, because it is far from straight-grained. At one point I broke
the strip clean through, with the grain running at 45 degrees across the strip.
I found that using a block of wood against the back of the strip right at the
point of bending helped to keep it from splitting.
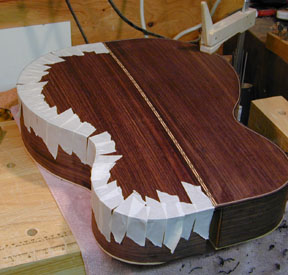
I first glued the purfling to the guitar and then the binding strip to the
purfled edge. I said that so I could use the word "purfled" and add it
to my spelling checker dictionary. The strips are held down while the glue sets
by pieces of masking tape. Some folks, I have heard, use cord or rope to do
this. One amateur etymologist claimed in the MIMForum that this is why
the binding is called binding. He's wrong.
I think.*
 Here's
what it looks like after gluing. The binding and purfling need to be scraped
flush to the surfaces of the guitar. I've started that process in this photo,
which accounts for the bits of fuzz you can see. I'm going to make a small
scraper holder that can be held in one hand, because clamping the box down and
contorting yourself to get the right angles on this while holding the scraper
flexed with both hands is for the birds. Scraping it down is going to take a
while, and I'd love to do it while sitting on the front porch instead of in my
basement shop.
Here's
what it looks like after gluing. The binding and purfling need to be scraped
flush to the surfaces of the guitar. I've started that process in this photo,
which accounts for the bits of fuzz you can see. I'm going to make a small
scraper holder that can be held in one hand, because clamping the box down and
contorting yourself to get the right angles on this while holding the scraper
flexed with both hands is for the birds. Scraping it down is going to take a
while, and I'd love to do it while sitting on the front porch instead of in my
basement shop.
 After
a couple of pleasant hours with a scraper, the binding is level with the sides
and back. At the top you can see the black-white-black veneer strips while the
binding itself is rosewood with a strip of maple veneer at the bottom.
After
a couple of pleasant hours with a scraper, the binding is level with the sides
and back. At the top you can see the black-white-black veneer strips while the
binding itself is rosewood with a strip of maple veneer at the bottom.
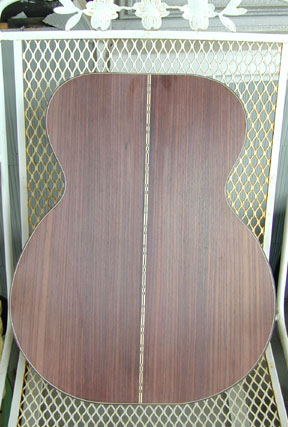 And
now it looks like something.
And
now it looks like something.
Previous Next
Home
Road Map Resources
Lutherie Tools
Copyright © 2001 Stephen Miklos